
Page 1
Last updated November 2020
Scroll through this document to see a description of all the great new features & content released in v17.0 (March
2020) and v17.1 (November 2020).
If you have an active subscription to Xara Designer Pro+ (available standalone or included in Xara Cloud Pro+, our
great value bundle of Xara Cloud and Designer Pro+) purchased from Xara, then these updates are free. If you are
an owner of an older version purchased from Magix, then check out our current offers on upgrades.
You can find Release Notes for the earlier Designer Pro X16 here.
You can see details on updates in the later Designer Pro X18 here.


XARA
DESIGNER PRO X
V16 Release Notes

XARA
DESIGNER PRO X
V17 Release Notes
Text Improvements
Paragraph Borders
Designer 16.3 added support for Paragraph Backgrounds. Now in 17.0 you can also set Paragraph Borders, with or without a paragraph background. These offer some great new choices for heading and paragraph styles (they are also quite a common style in Word documents, so improve the success of Word import). The Text Improvements heading above and in fact all Heading 1 headings in this document show an example of how this can be used. The headings are set to have a 1px border on all 4 sides, with a paragraph background color also set. As you can see the border and background extend to cover the entire width of the text area. To apply these effects, go into the Text Tool, place the text caret in the paragraph or heading that you want to change, right-click and choose Paragraph Border & Background … from the context menu. The same dialog is also available from the Paragraph Options button on the extended Text Tool InfoBar (press the … button on the end of the Text Tool InfoBar. This new dialog allows you to set the paragraph border and/or background in one place.Border Width
If you want a line to be shown on all or any of the 4 sides of the paragraph, set the border width you would like here. When you change this from its default value of None (no borders), all 4 side options on the right are enabled.Border Style
Once you’ve turned borders on by setting a width, you can also choose the border line style here.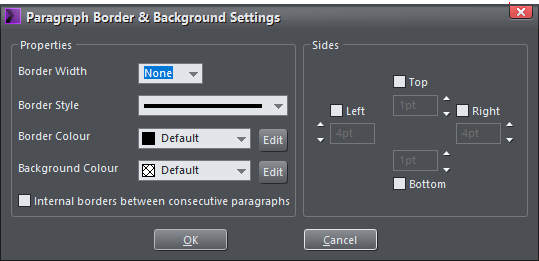
Page 3

XARA
DESIGNER PRO X
V16 Release Notes
XARA
DESIGNER PRO X
V17 Release Notes
Page 4
Border Color
Set the border line color here. You can either choose one of the document’s named colors from the dropdown list, or click the Edit button so you can use the color editor to choose any other color, or a shade of one of your document colors. You can also set the Paragraph Border Color from the color line, by right- clicking on any color and choosing the Set Paragraph Border option on the color menu. Note that you must first close the Paragraph Border & Background dialog to set colors from the color line.Background Color
This works in exactly the same way as the Border Color control and again you can set paragraph background colors from the color line. Choose the Default option if you don’t want any background color.Sides
On the right hand side of the dialog, the Sides controls allow you to turn the border line on or off for any of the 4 sides. You can also choose what size margin you want on each of the 4 sides. The left and right margin values control the space between the edges of the text area and the edges of the visible paragraph border and/or background. So for example if you want the border/background to extend well to the left of a left justified heading, so there is some empty space before the start of the text, increase the left margin value. Similarly the top and bottom margin values determine the space above and below the text respectively.Internal borders between consecutive paragraphs
If you have two or more consecutive paragraphs with borders, this option determines whether or not a border is shown between the paragraphs. Paragraph 1 Paragraph 2 Internal borders OFF
XARA
DESIGNER PRO X
V16 Release Notes
XARA
DESIGNER PRO X
V17 Release Notes
Page 5
Paragraph 1
Paragraph 2
Internal borders ON
Use with Text Styles
All the options described above work with Designer’s text styles, and when used with styles borders and backgrounds becomes a very powerful feature. Once you’ve setup one heading or paragraph with an effect you like, select it in the Text Tool and choose the Update option from the text styles menu to update the text style across the whole document. The Heading 1 style in this document has been setup that way, so all the major section headings have the same border and background settings.Tab Leaders
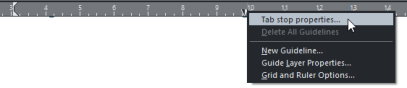
With Tab Leaders you can choose any character to fill tab spaces. Here for example the tab space between the first and second column has been filled using a “.” character. Second column You setup the character to be used for tabs using the new Tab Stop Properties dialog. You can access this dialog as follows: • In the Text Tool, place the text caret next to the tab space you want to change, or select the tab space. Then right-click and choose the Tab stop properties … option from the context menu. • On the ruler, right-click on the tab stop marker to open the context menu and choose the Tab stop
XARA
DESIGNER PRO X
V16 Release Notes
XARA
DESIGNER PRO X
V17 Release Notes
Page 6
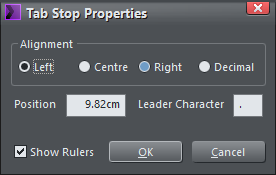
properties … option. Or simply double-click on the tab stop marker.
Alignment
The new dialog allows the alignment of an existing tab stop to be changed, between left, center, right and decimal options.Position
Normally the position of a tab stop is set using the tab stop markers on the Ruler, but here you can set the position numerically.Leader Character
Type any single character into this field, to fill the selected tab space with that character. Delete the contents of this field to revert to a normal unfilled tab space.Show Rulers
This checkbox is provided for convenience, to turn the Rulers on and off instantly. The top ruler shows the postions of tab stops for the current selected paragraph. Use Window > Bars > Rulers to control the same option from the Windows menu.Tracking Adjustments
You can adjust the tracking on a tab space to control the spacing of the characters of the tab leader. Second column Tracking set 0 (default) Second column Tracking set to 150 To set the tracking value, select the tab space(s) in the Text Tool. Make sure the extended Text Tool InfoBar is displayed (press the … option on the end of the Text Tool InfoBar) and edit the Tracking field.
XARA
DESIGNER PRO X
V16 Release Notes
XARA
DESIGNER PRO X
V17 Release Notes
Page 7
Table of Contents
Tab leaders are useful in a Table of Contents, to fill the space between each section heading and its page number, as in the Contents section of this document. Designer 17 sets the tab leader to a “.” by default when generating a new Table of Contents, if it includes page numbers (Insert > Table Of Contents).Moving Embedded Objects
Now in Designer 17 you can move embedded objects around in text just by dragging on them, a usability improvement that should be a great time saver. As you drag an embedded object over text, a blue rectangle is shown to indicate where the object will be repositioned if you release it at that position. The position of the top of the blue rectangle determines the line into which the object is inserted. Embedded objects can be set to inline, text flows to the right, or text flows to the left. You can control these settings from the Embedded graphic options dialog (right-click on the object and choose Embedded graphic options … on the context menu). The behavior when dragging embedded objects partly depends on which setting is enabled.Inline objects
If the object is inline and on a line of its own (no text to its left or right), dragging it left or right within the same paragraph, changes only the justification. It can be left aligned, center aligned, or right aligned. In the following example the photo is initially left aligned in the text and on a line of its own: Here it’s being dragged to the right, closer to the center of the text, so the blue rectangle indicates that it will be center aligned if released at this position: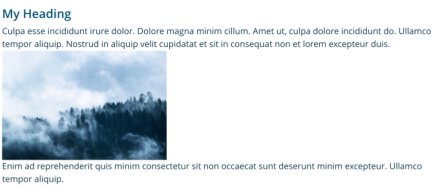
XARA
DESIGNER PRO X
V16 Release Notes
XARA
DESIGNER PRO X
V17 Release Notes
Page 8
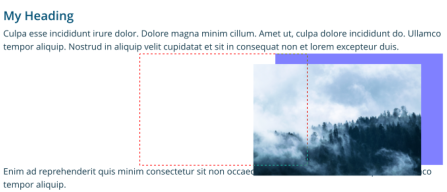
Drag it further to the right, closer to the right edge of the text, and it becomes right-aligned instead, again
as indicated by the blue rectangle:
On release the embedded object is repositioned as indicated by the blue rectangle.
If you drag the object up or down so that it will be embedded in a different paragraph, it behaves as
described in the next section.
Text flows left/right
If the embedded object is set to have text flowing to its left or right, or the object is dragged from one paragraph to another, the drag behavior is different. • Dragging the object near to the left edge of the text, will set it to text flows to the right. • Dragging the object near to the right edge of the text, will set it to text flows to the left. • And dragging it near to the center will set it to be inline, center justified on a line of its own (no text shown on either side). Again, as you drag the blue rectangle indicates where the object will be positioned.Small objects inline
It’s common to embed small objects like this icon inline in text, just as if it were a character, instead of on a line of its own as in the examples described above. In this case the drag behavior is different again, dragging simply allows you to position the object in text anywhere. A red text caret appears as you drag, to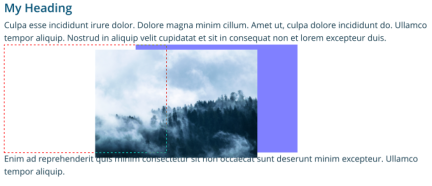

XARA
DESIGNER PRO X
V16 Release Notes
XARA
DESIGNER PRO X
V17 Release Notes
Page 9
indicate the insertion point.
Notes
• You can drag an embedded object from one text area/column to another. • If you drag an embedded object and drop it away from any text, it will be detached from the text it was embedded in. The object becomes an ordinary, independent, ‘floating’ object, which is no longer attached to any text. • You can’t embed a floating object by dragging it over text. To embed an object it’s still neccessary to cut/copy it to the clipboard, place the text caret in text and paste to embed the object at that position. Once embedded, you can relocate it by dragging it, as described above.Improved TOC (November 2020)
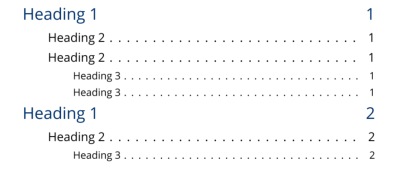
When a Table Of Contents (TOC) includes page numbers, you can now control how the tab space between the heading and the page number is displayed. You can choose what character should be used to fill the space (most commonly a “.” character, which is the default setting) and also the spacing of those characters in the tab space. Simple TOC with levels 2 & 3 tab spaces filled with “.” To insert a new TOC, place the text caret and choose Insert > Table Of Contents. Or to update an existing TOC, right-click in it and choose Table Of Contents > Properties, from the context menu. The Table Of Contents dialog appears.
XARA
DESIGNER PRO X
V16 Release Notes
XARA
DESIGNER PRO X
V17 Release Notes
Page 10
Table Of Contents Dialog
The Include page numbers option has been moved into a new Page Numbers section of the dialog. With
this option on, the other controls in that section become enabled, allowing you to choose the character that
should be used to fill the tab space before the page number, and the spacing of those characters. A spacing
value between 0 and 10 is normally suitable, but you can set higher values if you want much larger spacing.
You can set different character and spacing values for each of the first 3 levels (Heading 1 to Heading 3).
Levels 4 and above, if included in the TOC, will use the same settings as those set for Level 3.
If you don’t want any character to fill the tab space, simply clear the tab character field.
Spacing works by adjusting the tracking setting on the tab characters within the TOC. The dialog above
allows you to set any value in em/10 units. If you need finer control over the spacing, you can use the
Tracking control on the Text Tool InfoBar, to set any tracking value you like directly in the TOC, instead of
using the dialog. Select the first tab character on the first line of the TOC, to set the spacing for the first level
in your table. Set the tracking value you want on the tab, then right-click Table Of Contents > Update. All
first level lines of the TOC are updated to use the spacing/tracking that you set on the first line. Similarly
you can set the spacing for level 2 and above by selecting the tab in the first line of each level that appears
in the table and adjusting the tracking, then doing an Update.
The dialog only allows you to set the tab space character for the first 3 levels. But you can use the same
approach described above to overcome this, if you have a TOC with 4 or more levels. Select the tab of the
first Level 4 line, right-click, Tab stop properties…. Choose the character you want to use. Then update the
TOC as described above to update all Level 4 lines in the table.
Google Fonts Update (November 2020)
40 new fonts have been added to Designer Pro: Alata, Alatsi, Baskervville, Bebas Neue, Bellota, Bellota Text, Caladea, Calistoga, Comic Neue, Courier Prime, DM Mono, Epilogue, Gelasio, Girassol, Gotu, Grenze Gotisch, Gupter, Ibarra Real Nova, Inria Sans, Inria Serif,
XARA
DESIGNER PRO X
V16 Release Notes
XARA
DESIGNER PRO X
V17 Release Notes
Page 11
XARA
DESIGNER PRO X
V16 Release Notes
XARA
DESIGNER PRO X
V17 Release Notes
Inter, Jomolhari, Jost, Kulim Park, Manrope, MuseoModerno, Odibee Sans, Oxanium, Public Sans, Recursive,
Red Rose, Rowdies, Sen, Solway, Sora, Spartan, Sulphur Point, Tomorrow, Varta, Viaoda Libre
Workflow Improvements
New handle controls for various tools (November 2020)
Selector Tool
The selection handles in the Selector Tool have been updated. These are shown on all types of object that don’t have their own smart handles, and on all multi-selections as in the example below. Multi-selection with new Selector Tool handles When you are zoomed out, or have very small objects in your design, the selected object may be very small on screen so there is very little space for Designer to show the selection box with its handles. In such cases you will notice that Designer shows a larger selection box around the object, so it’s easier to work on it without having to zoom in.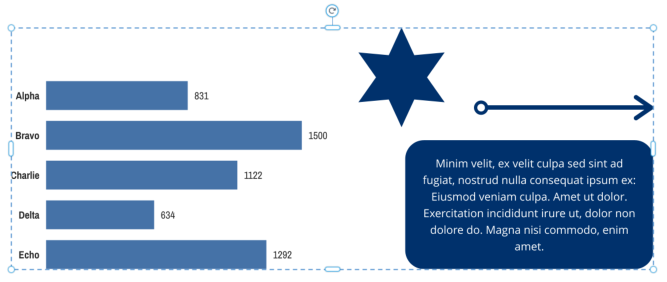
Page 12
XARA
DESIGNER PRO X
V16 Release Notes
XARA
DESIGNER PRO X
V17 Release Notes
SmartShapes
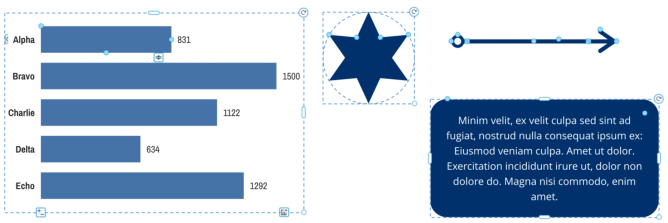
The handles on SmartShapes (tables, charts, shapes, text panels, etc.) have been improved, made more consistent and now match the handles used in Xara Cloud. Example SmartShapes with new handles Furthermore the workflow for inserting a SmartShape has been improved. Whenever a SmartShape is inserted into a document, the QuickShape Tool used to be selected, so that the object’s smart handles would be visible. However since we now have the option to show smart handles in the Selector Tool we select this tool instead when smart handles are on, as they are by default.QuickShape Tool
QuickShape Tool selection handles have been updated to match the new Selector Tool handle style.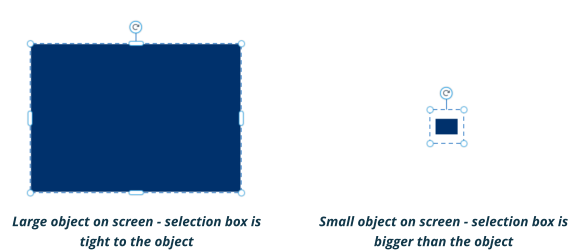
Page 13
XARA
DESIGNER PRO X
V16 Release Notes
XARA
DESIGNER PRO X
V17 Release Notes
QuickShape editing handles
Keep your settings (November 2020)
Users are no longer prompted about settings when starting an updated version of Designer. Designer will use the user’s current settings. In case users need to reset all settings back to their default values, a new Default Settings option has been added to Utilities > Options > Tune-ups. (Default settings cannot be changed in Web Designer Premium & Classic).New Rotation Center Workflow (November 2020)
By default when you rotate an object, the origin of the rotation is the object’s center point. But you can move this origin to rotate any objects around a common origin point. First turn on visibility of the rotate center by pressing the toggle button on the Selector Tool InfoBar. Rectangle selection with rotation center visible Now you can drag on the center point handle to move it anywhere on the page. For example if you move it


Page 14
XARA
DESIGNER PRO X
V16 Release Notes
XARA
DESIGNER PRO X
V17 Release Notes
to the center of the page, then when you rotate the rectangle or any other objects, they will all rotate
around the center of the page. Unlike in earlier versions of Designer, the visibility and position of the center
handle is now maintained until you press the button again to turn visibility off. You can change selection,
switch to and from other tools and even switch to different pages and the rotation handle keeps its
position. To revert to normal, where objects rotate around their own centers, just turn visibility off again.
Photo Improvements
Panorama Maker
Xara Designer Pro includes a copy of MAGIX Panorama Studio, which is a separate application you can download and install after you’ve purchased and unlocked Designer Pro. See the ‘download content’ option in the Help menu. Additionally Xara Designer Pro, Web Designer Premium and Photo & Graphic Designer include a more limited built-in Panorama Tool, available on the Photo Editing toolbar . The following improvements are in both the built-in tool and Panorama Studio unless stated otherwise. Improvements • Optimized image alignment with significantly higher speed for large panoramas and increased accuracy (Tool only) • A better error tolerance against bad control points , which improves the success rate for difficult panoramas. (Tool only) • Exposure correction provides more reliable results, even for panoramas with large over or under- exposed areas. • Improved RAW import. Now supports around 1100 cameras, including Canon's new CR3 format. (Panorama Studio only) • GPS data is now also read from RAW and DNG files. (Panorama Studio only) • Around 50 new cameras were added to the camera database which now contains more than 2530 cameras. (Panorama Studio only) • Improved WebGL performance in the Panorama Studio Viewer for interactive panoramas. (Panorama Studio only) • The Panorama Studio Viewer has also been updated for iOS 13 with regard to the gyroscope control and the minimization of the browser's address bar. (Panorama Studio only)Web Export Improvements
In v17 we have introduced a number of improvements aimed at helping your SEO efforts.Graduated Fill Optimizations
Some older browser versions did not support graduated fills and so Designer has always had to create
Page 15
XARA
DESIGNER PRO X
V16 Release Notes
XARA
DESIGNER PRO X
V17 Release Notes
images so that such fills would appear correctly in all browsers. Depending on the design, those images can
be large and so can add substantially to the overall size of a published document/website, increase the
publish time and even preview speed, due to the time needed to create the images. Those older browser
versions are now rarely used and so Designer no longer generates these images, relying on the browser to
show the fills correctly. That means a reduction in size which results in faster rendering of your webpages (a
factor in Google ranking) and faster publish/preview times with designs where graduated fills are prevalent.
Nofollow
This is a new option added to the Link dialog. When this is turned on for a link, it tells search engines encountering the link not to pass any ranking credit to the link target site. Typical usage is on testimonial or review pages, product listings and the like, and it’s intended to enhance the credibility of your content, reduce links to spam content and improper manipulation of the search results. Exactly how search engines use this information varies with search engine and may change in future.Image filenames
You can now control the filename with which any image is published in a website or web document, which can help SEO and your position in image search. Select the object and open Utilities > Web Properties > Image tab. In the Image section of the dialog you can set the preferred filename to be used. If the filename is not unique within the current website/document, Designer will append a number to the name to make it unique.New Supersite UI (November 2020)
Documents published to web with Designer (such as presentations or Supersites) now have a new User Interface which includes: • Full screen button • A downloadable PDF of the whole document/site • A popup page thumbnail bar • Additional navigation buttons for zoom and pages • Powered by Xara logo in the top left corner
Page 16
XARA
DESIGNER PRO X
V16 Release Notes
XARA
DESIGNER PRO X
V17 Release Notes
New options for presentations and SuperSites
To turn it on activate the Include Page Thumbnails & PDF Download checkbox on the Utilities > Web
Export Options dialog. If the option is off, sites and documents export to web the same way as with earlier
versions of Designer. In all cases websites set to export as Conventional Website in the Utilities > Web
Export Options dialog will work as before with no additional navigation UI added.
Image Import Resolution (November 2020)
In earlier versions of Designer large images imported into web documents were always automatically reduced in size to Full HD resolution. Designer now prompts about this so the user can choose to import either the original image or a reduced image, as when importing into print documents.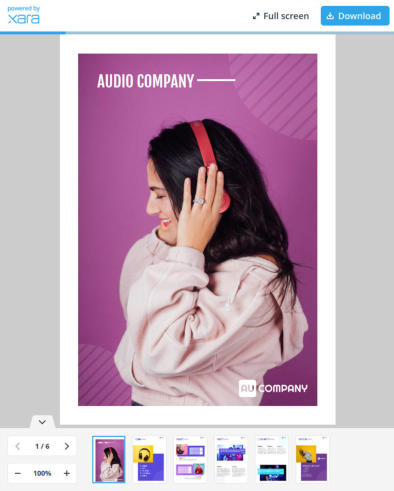
Page 17
XARA
DESIGNER PRO X
V16 Release Notes
XARA
DESIGNER PRO X
V17 Release Notes
SmartShapes
Footer Designs (November 2020)
These are new components that automatically size and position themselves at the bottom of the page on insertion. They are also made repeating on insertion, so that they appear on every page of your design. Example Footer design Each footer typically has a logo, page number and a line of text. To insert a footer use Insert > Footer …, which opens the Content Catalog at the selection of footer components. If you insert a new footer when there is already a footer in the design, the new footer replaces the old one and where possible the content of the old footer is maintained in the new footer.Improved tables (November - 2020)
You can now press the Tab key to move from one table cell to the next, or Shift+Tab to move backwards. If you press tab with the text caret in the last cell of the table, a new row is added. [Note: This tables update includes internal changes that make them incompatible with tables in previous versions of Designer. Tables are converted on document open. After this conversion if the document is saved and then opened in an older version of Designer the tables will look correct but will not be editable - they will be shown as inactive when selected. Text, photos, etc. within the table cells is still editable. ]New Content
As usual we have some great new additions to the Online Content Catalog (provided as part of the Update Service). • 40 new Facebook templates in the Social Media category • 5 new templates in the E-book category • 1 multi-page website (Nonprofit) in Websites > Modern Business Websites • 1 single page website (Portfolio) in Websites > Single Page Websites
Page 18
XARA
DESIGNER PRO X
V16 Release Notes
XARA
DESIGNER PRO X
V17 Release Notes
Content Update (November 2020)
As usual we have some great new additions to the Online Content Catalog (Note: The full template set is only available in the Plus version). • 9 new Footer designs in Components > Print & Web Components (*New category) • 6 new Text panels in Components > Print & Web Components • 5 new tables in Components > Print & Web Components • 9 new diagrams in Components > Print & Web Components (*New category) • 5 new photo frames & Photo Panels in Components > Image Resources • 38 new Facebook templates in the Social Media category • 40 new Instagram templates in the Social Media category • 2 multi-page websites (Jewelry Online Shop & Creative Portfolio) in Websites > Modern Business Websites • 10 new presentation templates in Presentations > Presentation ThemesImport / Export
Designer is already well known for the breadth and depth of its support for import and export formats, which we continue to expand with each new release. In v17 we’re excited to introduce the first steps to full import support for a new format, InDesign. In addition all the main import and export filters have been updated to support the new Paragraph Borders and Tab Leader features, as well as the improvements listed below. And as always, all filters have many other small improvements and bug-fixes made in response to user and testing feedback.NEW InDesign Import (BETA) (Designer Pro X only)
Designer Pro 17 introduces the first beta version of an InDesign document importer. This does not yet support import of all InDesign features, so most documents will need to be manually corrected in Designer Pro after import. Please give feedback on your experiences with this importer, via the talkgraphics.com forum, to help us improve it in future updates!IDML files only
InDesign designs can be saved in either INDD files (.indd file extension) or IDML files (.idml file extension). In common with most other applications that import InDesign files, Designer only supports IDML files. Any InDesign document can be saved as an IDML file from InDesign.Linked files
Some InDesign files link to external image files, instead of having the images embedded within the .idml file. Designer will handle these as long as it can find them, so if you move or make copies of the .idml file, make sure any linked image files are moved/copied with it.
Page 19
XARA
DESIGNER PRO X
V16 Release Notes
XARA
DESIGNER PRO X
V17 Release Notes
Fonts
If a design uses a font with a name that matches one of the hundreds of Google Fonts known to Designer, and you don’t have that font installed already, Designer will offer to automatically download and install the missing Google font. InDesign files don’t have the fonts that they use embedded inside them, so if a design uses any other fonts that you don’t have installed, Designer will warn you about these missing fonts and will use a substitute font instead. Therefore text using such substituted fonts will look different in Designer.Supported Features
The following features are supported: • Double page spreads • Master spreads (objects on master spreads are just imported as regular page objects in Xara) • Page numbers • Bleed margin • All fill and stroke attributes that are supported by Designer, including flat fill, linear and radial gradients (simple and multistage), line width, line cap style, line join style, dash style, transparency, transparency type (blending mode) and overprint. • RGB, CMYK & Lab colors, support for color tints • Raster images: BMP, JPEG, PNG and GIF format. Linked and embedded image files are supported • Groups • Transformations. These are applied during the import process. • Any shaped text frames - these are imported as ‘text inside shapes’ in Designer • Linked text frames (text frames with multiple columns). Rectangular text frames only • Text fitted to a path • Text repelling • Import of all text attributes supported by Designer, including hyphenation settings and Open Type font features • Paragraph and character text styles • Paragraph borders and background color • Bulleted/numbered lists • Embedded/anchored objects in text • TablesUnsupported Features
In this first version of InDesign import there is limited or no support for: • Layers. All objects are imported into a single layer in Designer, but the relative z-order of all objects is maintained. • Baseline grid and Alignment to this grid. This means InDesign text with this feature enabled may not be accurately positioned in Designer and so text positions/spacing may need to be manually adjusted. • Color profiles • Embedded/linked EPS and PDF images
Page 20
XARA
DESIGNER PRO X
V16 Release Notes
XARA
DESIGNER PRO X
V17 Release Notes
•
Animations
•
Multi-state objects
PDF Import
• Fixed issues with import of ligatures and text line spacing • Improved text reconstruction • Fixed issues with import of bitmap images and JPEG2000 imagesPDF Export
• Fixed issue with misaligned text containing embedded graphicsWord Import
• Improved clipping of footers. • Fixed rotation of picture objects. • Fixed alignment of floating objects inside tables. • Fixed spacing of embedded objects in text.Word Export
• Improved export of linked text areasPowerPoint Import
• Improved mapping of PowerPoint text boxes to equivalent Designer text areas or text columns • Improved accuracy of vertical positioning and height of text areas • Added import of slide titles as page names • Added locked shapes import • Optimizations to reduce memory usage during import • Improved handling of rotated, flipped and grouped text • Fixed issues with wrong attributes on blank lines • Fixed border width and colors in imported tables • Better handling of transparency on background layers • Fixed shadow properties to better preserve their appearancePowerPoint Export
• Improved group handlingSVG Import
• Fixed deadlock when importing an object with a clip path specified in a ‘style’ attributeSVG Export
• Fixed rounded quick-shape rectangle export
Page 21
XARA
DESIGNER PRO X
V16 Release Notes
XARA
DESIGNER PRO X
V17 Release Notes