Xara Web Designer v20 Release Notes
Scroll through this document to see a description of all the new features released in Xara Web Designer v20
(2023), a one-time purchase option from Xara.
Note: If you have an active subscription to Xara Web Designer+ purchased from Xara, then all of the updates
mentioned below are already included in your version, as well as later monthly updates released under the Plus
subscription plan, and the entire premium Online Content Catalog (now called Xara Elements). If you wish to
benefit from these regular updates, Xara Elements and premium support, then the Plus subscription is for
you.
You can upgrade any older version of Web Designer from Magix or Xara to either Web Designer v20 or Web
Designer+, check out our current upgrade offers.
You can find Release Notes for the earlier v19 here.
Page 1
Last updated November 21, 2023


Web Improvements
Shapes as SVG for Faster Sites
Modern web browsers have great SVG (Scalable Vector Graphics) support, which means we can now export many more types of graphical object to web using SVG, instead of having to make separate bitmap image files for each one. As a result your website and web documents load faster - with all the usability and SEO benefits that brings - because there are fewer bitmap images to download. What’s more, your content also looks sharper as SVG. All you need to do is turn on the new Shapes as SVG option at the bottom of the Utilities > Web Properties > Website tab. Then Xara will automatically use SVG for as many objects as it can when exporting your document for the web. Given the importance of page loading time to page rank, this is a valuable improvement for your SEO efforts. Flat fills, linear graduated fills and circular graduated fills, all now export as SVG, as well as specific cases mentioned below. Which means it’s now possible to build graphically rich web documents and websites that have no images to download at all! Wall Shadows as SVG Wall Shadows created with the Shadow Tool will now export as SVG instead of as images. Wall shadow is by far the most commonly used type of shadow. Floor shadows and Glow shadows will continue to export as images, due to a lack of direct support for these shadow types in SVG. Elliptical Fills as SVG Elliptical fills are now also exported as SVG, in addition to Flat, Linear and Circular fills which were already supported. Mix & Multiply Transparency as SVG Objects with Mix or Multiply transparency are now also exported as SVG. Export group as single image Sometimes you may want to force a group of objects to export as a single image, even when you have the Shapes as SVG option on. There has always been an option for this, but the UI for this is now clearer and simpler, at the bottom of the Utilities > Web Properties > Image tab. New groups export as SVG With this update, new groups you create (Arrange > Group) when Shapes as SVG is on, will export as SVG
Page 3
Last updated November 21, 2023

Page 4
Last updated November 21, 2023
unless you deliberately turn on the above Export group as single image option for the group.
And the same applies to groups created by importing graphics from SVG or PDF files - these groups will
also now export as SVG by default.
Other performance improvements
In addition to the SVG changes, we’ve made other refinements that will help improve page load speeds for the benefit of your SEO: • Several JS files are no longer exported when not required. • Optimized CSS by removing deprecated fall-backs. • Reduced render blocking scripts. • Up to 15% improvement in performance for mobile devices in our own tests.Improvements for mobile
We’ve made some changes to the way exported documents/websites work on mobile and touch devices, to improve the user experience: • A swipe will no longer change page if there is an active text selection (if the user is trying to select text on a touch device, by dragging on the selection markers on the text, it shouldn’t navigate to the next/previous page if the user misses the selection markers with their drag). • A vertical swipe will no longer change pages on pages with vertical scrolling (on long pages that won’t all fit on the screen, the user needs to scroll by swiping up/down. Therefore this shouldn’t navigate to the previous/next page, only horizontal swipes should). • Improved page animations on pages with vertical scrolling.Widget Editing
Now when you insert or edit a Widget you’ll see this new Widget window appear.
Page 5
Last updated November 21, 2023
Widget Editor
For widgets that are provided by an external service, such as a Google Map, configuration of the widget in
the external service is now done using your regular browser, instead of inside a web window inside
Designer. This means that signing into the external service will generally be easier, because your browser
probably has features helping you sign-in, such as saved passwords or a password manager. Also you can
work in a full size browser window, rather than in a smaller web window inside the application.
Press the Edit in browser button to open the external service in your default browser. Once you’ve setup
your widget, copy the widget code from the external service and then come back to Designer to paste that
code into the widget window.
Most widgets have an online help page available, which will advise you on how best to use the external
service with Designer, how to find the code in that service and other helpful tips. Press the How to get
HTML code link to open this help.
There are some lesser used widget options in the Utilities > Web Properties dialog that are not available
in this new window. Press the Advanced button to jump directly to this dialog, if you need to use these
options.
NavBar Improvements
Change NavBar Style Previously you could already change the style of your NavBar by dragging and dropping a new NavBar from the Designs Gallery onto your existing NavBar. This feature has been made more discoverable with the addition of a Change style button to the NavBar dialog, which opens the Designs Gallery onto the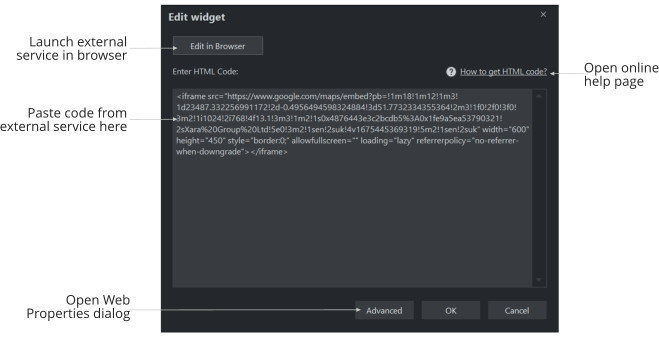
Page 6
Last updated November 21, 2023
NavBars folder. Also you can now simply select your existing NavBar and doubleclick a NavBar in the
Designs Gallery to change style.
Use any font in menus
You can now use any font you like in the menus on a navigation bar (NavBar), you are no longer limited to
the restricted set of web-safe fonts. That means you can now use the same fonts you use on other text in
your website, including the huge range of Google fonts.
NavBar Pop-up menu style - full font list
To change the menu font, double-click on your NavBar and use the Pop-up menu style … button to open
the menu settings dialog.
PDF Filename in Web exports
The PDF file that can optionally be included when a document is exported to web, is now named according to the filename of the current document. So for example if the current document is ReleaseNotes.xar, the PDF file will be ReleaseNotes.pdf.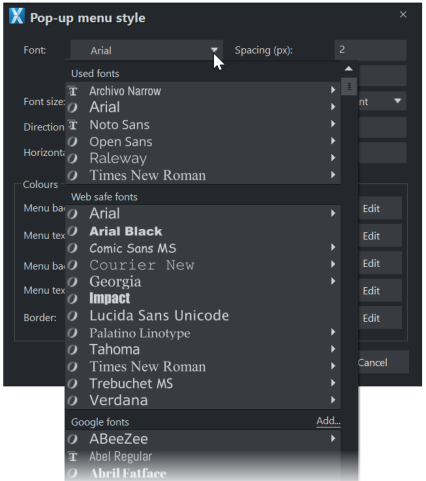
Page 7
Last updated November 21, 2023
Positioning of New Live Shares
Now when you Live Share an object with other variants, it is positioned more usefully in those other variants, relative to neighboring objects. Where you need a different layout in the other variant(s), you will still need to manually re-position the shared object, but in most cases this will be a time-saver.Other Web Improvements
• Web publishing (sFTP). Compatibility problems with some external hosting services solved. • Canonical links in conventional websites now reference the correct page filename. • rel=”noopener” can now be stripped from a web link with a blank target by applying the name “opener”. • WebP web export option could sometimes be auto enabled when saving a template after applying a page background. Fixed. • Some characters missing from web export due to self-hosting of Google Fonts. Fixed. • Can’t interact with a form that has reveal animation applied. Fixed • Wrong miter on imported SVG. Fixed. • WebP export fails after exporting a low bpp PNG. Fixed. • Repeating photo failed to ‘stick at top’. Fixed. • Some non-JPEG images get exported as JPEG in web export. Fixed. • Web export hung exporting specific document with repeating group. Fixed. • Links applied to list paragraphs should not include the list bullet/number. • Error using popup photo feature with photo gallery widgets. • Image Alt-text missing in web export of document. • New documents/websites will export to .html files instead of .htm. An option to change this for existing documents/websites is coming soon. • NavBar sub-menu displayed without its background. Fixed. • Alt text for background images. • Link dialog: Link to page and Link to heading menus are now wider to show longer headings and page names. • Adding link to PDF doesn’t work if website is set to export to .html. Fixed. • When you delete an object that is shared with other variants, a prompt offers to delete from all variants. • Dragging live shared embedded objects between text areas doesn’t work across variants. Fixed. • Widget/placeholder HTML Head code is now shared across variants, as body code is. • Google Analytics code is now inserted immediately after <head> element, the current recommendation from Google. • NavBar menus with links to headings not updated correctly. Fixed. • Links to SmartFields would only open in current tab. Fixed. • Link dialog can delay selection changes in documents with many links. Fixed. • Web export problems when exporting with All layers/objects visible. Fixed. • Spurious internal error on second attempt to publish. Fixed. • Screen redraw problem after inserting Web Block from Designs Gallery. Fixed. • Smart duplicate of live shared text column doesn’t work correctly. Fixed.
Page 8
Last updated November 21, 2023
•
Menu now closes on touch devices after selecting a menu item.
•
Document causes export to web to hang during export. Fixed.
•
Image Alt text is now shared across web variants.
•
Web export of Open Sans Light font wrong when Bold applied. Fixed.
•
Web export: Button clickable prior to being visible
Tables
Tables are often a key part of any business document, which is why we’ve been working on a new, very flexible and powerful Table Tool, to replace the old Smart Table SmartShapes. You will find the new tool at the bottom of the main Toolbar on the left .Creating Tables
The Table Tool InfoBar is where you can change the settings for a selected table or selected cells in a table. In the Table Tool, click the first button on the InfoBar to quickly create a new table . Or you can click- drag on the page, to drag out a new table with the number of rows and columns you want. There are also seven ready-made table designs in the Designs Gallery that you can drag and drop onto the page.


Cell padding
Cell horizontal justification
Cell vertical justification
Cell background color
Merge and split cells
Cell borders

Create table
Insert rows


Delete rows


Delete column


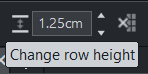
Row height

Insert Columns

Column width

Cell spacing & table
background color


Page 9
Last updated November 21, 2023
Create all the tables you need with the new Table Tool
Table Size
In the Selector Tool, single-click to select the table, then simply drag the table width/height handles to
change the width/height of the whole table. Or you can set the width and height in the InfoBar, as you
would with any other object.
Changing Rows & Columns
When you have a table selected in the Table Tool, move the mouse pointer over the hotspots as shown
below.

Page 10
Last updated November 21, 2023
Using these controls you can quickly add rows and columns, change row and column sizes, select and
delete rows and columns, all directly on the table without using the InfoBar. Use Ctrl+click or Shift+click on
the row and column headers to select multiple rows/columns. Backspace will also delete a selected row or
column (whereas Delete will delete the contents).
You can set the selected row heights and column widths on the InfoBar numerically, which makes it easy
to give multiple rows or columns the exact same sizes.
Selecting Cells
Selecting cells you want to change is easy. First click to select the whole table, then in the Table Tool you
can click on individual cells to select them. Or click-drag to select a rectangular range of cells. You can also
Ctrl+click on a cell to add it to the current selection, or Shift+click to extend the current cell selection range.
You can also select multiple cells while in the Text Tool, by simply click-dragging.
Cell Contents
Once you have selected the cell(s) a simple Delete will delete the contents. The usual copy and paste
commands will work, Ctrl C and Ctrl V. Font, font size and color can be changed like regular text.
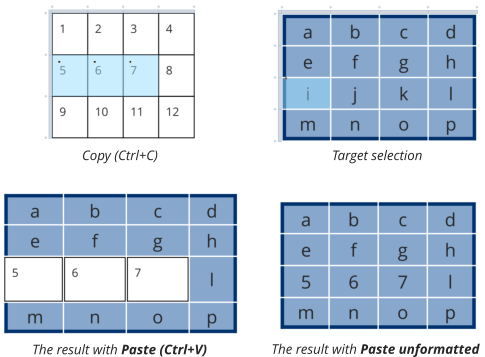
Paste unformatted
Sometimes when working with tables you’ll want to copy the contents of one table to another table. If you


Page 11
Last updated November 21, 2023
simply copy the cells of one table, and paste them onto another, this will also paste the style of the source
table cells, as well as the content.
When that is not required, there is a Paste unformatted option, in the right-click context menu. So to
paste just the cell contents, copy (Ctrl+C) the source cells in the first table, select the target cells in the
second table, then right-click and choose Paste > Paste unformatted from the context menu.
Cell Background Color
By default cell background color is white. To change this, select the cell or cells you want to change, and
click the new color you want in the Cell color background dropdown on the right side of the InfoBar,
which includes all the theme colors in the current document. If you select the Edit option in that
dropdown, you can open the color editor to create a custom color. Alternatively you can right click any
color on the color line and select Set Table Cell Background.
Note there is also a table background color behind the cells, which you will see if you open up spacing
between the cells; see Table Spacing & Background Color below.
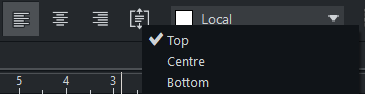
Cell Justifications
You can choose between left, right and center justified text using the buttons on the InfoBar.
Page 12
Last updated November 21, 2023
Use the vertical alignment dropdown to choose between top, center or bottom aligned text in the cell.
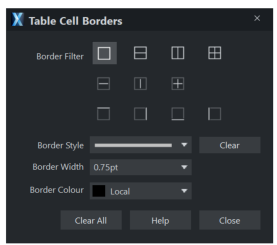
Cell Borders
Click the Borders button
on the right end of the InfoBar to open the Borders dialog.
Borders Dialog
First select the cell(s) you want to change as this dialog always works on the selected cells only. In the top
Border Filter section of the dialog you first choose which borders you want to change. For example if you
want to change only the right side of the whole cell selection, select the
filter. Then as you change the
border style, width and color in the lower half of the dialog, only that right side border will change. If you
want to change all borders of every individual cell in the selection, choose the
filter, then again choose
the border settings you want.
If you have a lot of different border colors, styles and widths in your table, you may have to perform
several border changing operations on different cell selections with different Border Filters, but every
possible combination of borders on a table is possible!
Cell Padding
Cell padding is the space you see between the text in a cell and the borders of that cell. In most cases it’s
desirable to have some non-zero padding applied, so text doesn’t appear too close to the cell borders.


Page 13
Last updated November 21, 2023
Table Spacing & Background Color
The table spacing setting lets you add space between all the cells of the table. Most tables tend to have
zero spacing, meaning that cell borders overlap with no space between one cell and the next.
The color you see in the spaces between cells, blue in the example above, is the Table Background Color.
You can change both of these using the Table background color and Spacing between cells options in
the Table Properties dialog. Bring up the dialog by clicking the
button on the Table Tool InfoBar.
You can also set the Table Background Color with a right click on a color in the color line > Set Table
Background.
Table Properties
Header & Footer Rows
In the dialog there are options for setting the number of header and footer rows on your table. This
information is used when copying and pasting the style of a table from one table to another. To do this
select a table and press copy (Ctrl+C). Then select a different table and do Edit > Paste > Paste
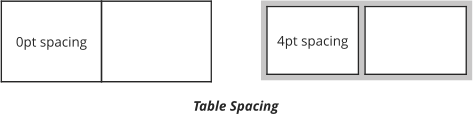


Table text with
no padding
Table text with
4pt padding
Cell Padding
Page 14
Last updated November 21, 2023
format/attributes (Ctrl+Shift+A).
Header and footer rows will become much more important once tables can be split across pages and text
columns, which is coming soon to the Table Tool!
Merging & Splitting Cells
Select multiple cells and click the Merge button on the InfoBar, to merge them into a single cell.
For example you can easily add a header row to a table by selecting all the cells in the first row and
merging them into a single cell.
To unmerge/split cells again, select them and click the Split button.
Re-order rows & columns
You can re-order rows and columns using drag and drop. To move a single row, simply click+drag on the
row header. As you drag up/down, a thick blue line shows you where the row will be moved to. To move
multiple rows at once, first select the rows (use Ctrl+click and Shift+click to add rows to the selection) then
drag on one of the row headers.
Similarly you can move columns left/right using the column headers.
External data in Tables
You can copy and paste text and numbers from your spreadsheets and other sources into Xara tables. Simply copy the cells you want to copy in your spreadsheet, then in the Table Tool select a table cell and paste (Ctrl+V). Technical notes: This should work with data from any application that is able to place TSV (Tab Separated Values) as unformatted text onto the clipboard, when you copy it. If you find it doesn’t work with an application you use, please let us know. Support will be added for pasting data from HTML format in a future release.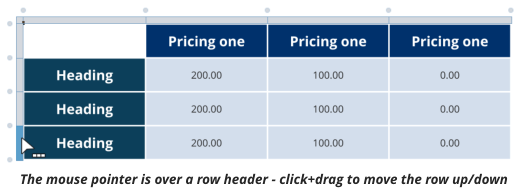
Page 15
Last updated November 21, 2023
Export to Word & PowerPoint
Xara tables will now appear as editable tables in MS Word, when documents are exported to Word (.docx) format. Xara tables should now also look visually correct in exported MS PowerPoint (.pptx) presentations, but the tables are not currently editable in PowerPoint (text can be edited but the table won’t update).Convert old tables to new
The old Smart tables will continue working as before, but will not be improved in future. But now with one click you can convert these to new tables, so that you can edit them with the new Table Tool. Whenever you click on an old table, you’ll be asked if you would like it to be converted. You should see that the converted table look almost exactly the same as the old table, although you may see some small differences. The prompt will allow you to refuse the conversion and to turn off future prompts, but we strongly recommend you convert all old tables to new tables when you next need to edit them. Old tables will continue to work for now but may not be supported in future.Useful Table Shortcuts
• Double click on a cell in the Table Tool, to jump to the Text Tool and start adding/editing text in the cell. • When you’ve finished typing in one cell, press Tab to jump to the next cell, or Shift+Tab to move to the previous cell. When you are in the last cell of a table, pressing Tab again will automatically add a new row so you can keep extending the table. • Clear the contents of all selected cells by hitting the Delete key. Delete will also clear the contents of a selected row(s)/column(s), whereas Backspace will delete the row(s)/ column(s). • If you are in the Table Tool with a cell selected and you press the Return key, Xara will switch to the Text Tool and place the caret at the end of the text. • You can set cell background colors and table background colors using the color line, as well as on the InfoBar. Select the cells, right-click on the color line and choose from the menu. • You can drag and drop embedded objects between cells.User Interface & User Experience
New Look User Interface
Xara Web Designer has a new, clean, modern appearance. Key highlights: • The new darker background puts more focus on your design, with less user interface distractions
Page 16
Last updated November 21, 2023
•
There are new, clearer icon designs throughout.
•
All icons and mouse pointers are now High DPI, so they look sharp and clear on high resolution
displays
•
And other minor tweaks and improvements - for example in the Page & Layer Gallery, the Page
names are now separated from the page thumbnails, so both are clearly visible.
Web Windows to Edge
(Introduced in 19.0.2 the version of 19 sold by Xara, these features are not in v19 if purchased from Magix) There are several functions in Web Designer that bring up a web browser window inside the application, to display content, including: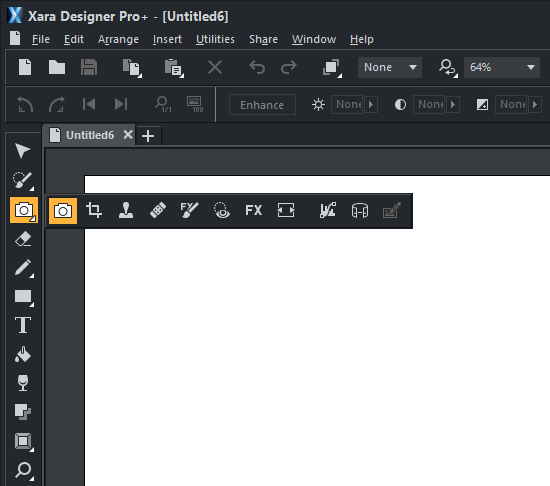
Page 17
Last updated November 21, 2023
The Widget editor
Used when inserting/editing most of the widgets available in the Designs Gallery.Google Font Finder
Launched when you click Add in the Google Fonts section of Fonts menu.Symbol picker
Launched when you click Insert > SymbolErase Tool Guide window
A guide to using the Erase tool Until now these have relied on using a variant of Internet Explorer. But since Internet Explorer is coming to the end of its life and support for it on the web is declining, it’s time to upgrade these windows. The Widget Editor in particular was becoming a problem, as external widget provider websites have been dropping support for Internet Explorer. So with this update, all the above web windows are now using the latest Microsoft Edge technology instead.The Designs Gallery
Web Designer includes a starter pack of content, from tables and text panels to social media posts. These are found in the Designs Gallery, which offers a convenient way of importing components and other content into the current document, by simply drag and dropping them from the Gallery onto your document. The Insert menu options insert objects from the Designs Gallery. Note: the Online Content Catalog (now renamed Xara Elements) is only available in the Plus versions of Designer titles. This includes the entire Xara content and component library and is constantly updated as part of the Plus subscription. You can find out more about this content on our Xara Elements page.Online Help
Web Designer help is now online. The various Help buttons throughout the application now open your default web browser onto the online help system, where you can browse and search the help, just as you could with the locally installed help in earlier versions. Having the help online allows Xara to update it more frequently without having to release application updates, and to integrate it with the online knowledgebase articles.
Page 18
Last updated November 21, 2023
Line Gallery
In previous versions of Web Designer, when interacting with the Line Gallery for the first time in every session, there was a delay of a few seconds while Xara downloaded all the different brush definitions that are available in the gallery. In some cases this also caused the current selection to be lost. This has now been improved so that each separate brush definitions folder is loaded only if/when needed, so there is no initial delay when using the gallery and the selection is always maintained.Other UI and UX Improvements
• Scrollbar thumbs now more visible against scrollbar backgrounds. • The number of decimal places shown in the UI is no longer linked to Windows settings, which caused some user confusion. It now defaults to 2 decimal places and can be changed in the registry if required.Text & Document Management
Font Menu Improvements
• The font menu used to automatically scroll to the current font when opened. This meant that the most useful part of the font menu, the top section that shows the fonts used in the current document, was often out of view. So now the menu always opens with the top of the font menu visible. • Some font type icons missing in the menu, on HiDPI displays. Fixed.
Page 19
Last updated November 21, 2023
Multi-line SmartField Values
SmartFields are another great time-saving feature of Xara Web Designer, offering an efficient way to deal with commonly used text phrases that you want to insert in multiple places in text. In this update we’ve added the ability to have multi-line SmartFields. Open the SmartFields dialog (Utilities > SmartFields…), select a SmartField in the list and press the new Edit button, to bring up the multi-line text editor. SmartFields can now be multi-line- postal address is a typical example Where a value has more than one line, only the first line is displayed in the dialog and a … symbol in the right column indicates that the SmartField has more than one line. You can also click in the right side column to bring up the multi-line editor and see the full multi-line text. Note you can still edit single line values directly in the dialog.Personal SmartFields
The set of Personal SmartFields in Web Designer (Utilities > SmartFields …) has been extended to match the fields in your Xara Cloud profile, so that templates and documents using these fields will work the same way in both Web Designer and Xara Cloud. The new fields in Web Designer are full address, website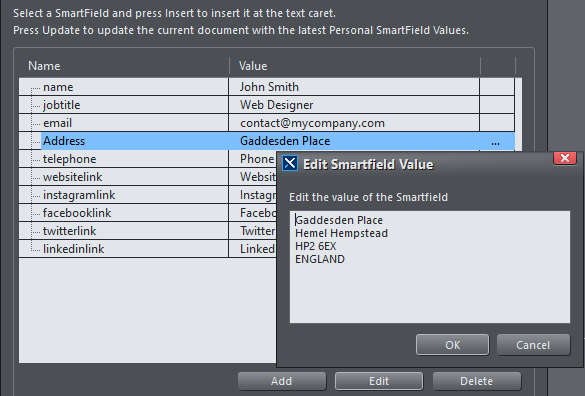
Page 20
Last updated November 21, 2023
text, facebook text, instagram text, linkedin text, twitter text, tiktok text and link, adding to the great time-
saving potential of SmartFields.
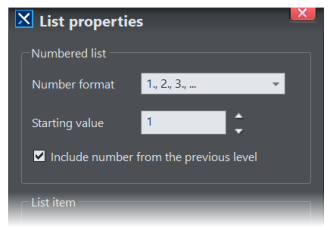
Numbered Lists
Normally when using Numbered Lists, only one number is shown at the start of each list point, as in the left example below. But now there is also the option to show parent numbers too, as shown in the example on the right: This new option is available in the List Properties dialog. To show the dialog, place the text caret in a list, right-click and choose List properties … in the context menu.Change font size and Auto-fit
Auto-fit is a feature on a text area, whereby the font size of the text is set automatically by Web Designer, so that the text fills the text area container exactly. See the vertical text alignment option on the Text Tool InfoBar . This works even when you have a mix of different text sizes - the relative size differences are maintained. However if all the text is the same size, and you don’t realize that auto-fit option is on, it can be confusing. Attempting to change the font size manually will do nothing, because the font size is set automatically. It’s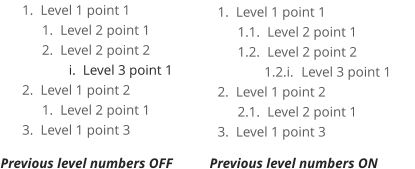

Page 21
Last updated November 21, 2023
an easy mistake to make if you’re editing a template and don’t realize that auto-fit is on.
So now if you attempt to change the font size on all the text in a text box with auto-fit on, auto-fit is turned
off automatically, so that the text size change will just work. The same happens with the related Shrink
text on overflow option.
Handling missing characters
Automatic font selection Xara Web Designer now helps you to find and apply fonts that support characters that are not supported by the majority of Google fonts. For example if you enter or paste a Chinese character such as into text that is using a typical Google Font such as Open Sans, the character won’t appear correctly because Open Sans does not support Chinese characters. Instead you will see or similar in the text. Now when you enter such a character, Xara will check your device for fonts that do support the character. If it finds one, the font will be changed so you should see the character appear correctly. When changing the font automatically in this way, Xara will choose a font that is already being used in the current document where possible, to avoid introducing lots of different fonts. NOTE: Currently this automatic font selection only happens when pasting in unformatted text at the text caret, not when pasting from other formats such as HTML. Go into the Text Tool, place the text caret, select Paste and choose Unformatted text. This will be improved to include all types of paste in a future update. Alternative Font Suggestions If you don’t like the automatically chosen font, select the character(s) in the Text Tool, right-click and you should see a Font Suggestions entry at the top of the context menu. This shows you all the fonts installed on your device that support the first character in your text selection.
Page 22
Last updated November 21, 2023
Font suggestions for selected Chinese character
You’ll see the selection update to preview the font that is under your mouse pointer, so you can quickly
choose which font works best.
Google Fonts
For Chinese, Japanese and Korean characters, Xara will first look for the most popular Google fonts that
support the character set, if any are installed on your device. You can find the names of such fonts by
searching for them on Google Fonts, using the Language filter, then download and install them onto your
device using the Add option in the Google Fonts section of the Fonts menu in the Text Tool of Xara Web
Designer. Once installed, you should see them in the main Fonts menu and in the Font Suggestions
menu described above.
Other Text Improvements
• Spelling dictionaries updated. • Dead accent key handling fixed, when working on text inside smart components. • Serious error on starting text edit due to mis-handled font. Fixed. • Serious error merging in List Styles on paste/import. Fixed. • CID font Noto Sans causes serious error. Fixed. • External text pasted into list not added as list items. Fixed. • Serious error in flowing document as anchored object flows up. • Pasting list items from external source into list, did not add list items. Fixed. • Can’t scroll to all pages in Page & Layer Gallery due to new page name position. Fixed.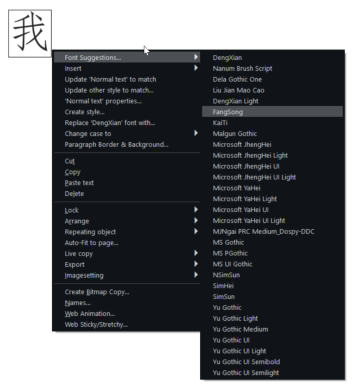
Page 23
Last updated November 21, 2023
•
Inconsistent font sizes when pasting same sized text into ‘Shrink on overflow’ text boxes. Fixed.
•
Error when pasting list items into an existing list. Fixed.
•
Scrolling and text editing performance improvements (noticeable with larger documents with many
pages).
•
Spelling dictionaries have been added for Ukrainian and Amharic.
•
Can’t move text caret between consecutive embedded objects with arrow keys. Fixed.
Photo & Graphic Design
Selection and the Selector Tool
The following changes have been made to selection handling in response to user feedback and to make selection more consistent across different object types.Offset handles
Selector Tool transform handles are now offset by a small distance so that they don’t obscure any part of the selected object, or get in the way of any other handles on the object. The offset remains constant for all zoom levels and does not affect object snapping. In addition to the lollipop rotation handle, there are hidden rotate ‘hotspots’ just inside the 4 corner resizing handles (in the offset gap).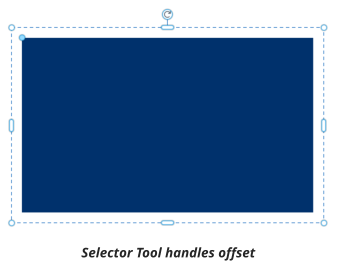
Page 24
Last updated November 21, 2023
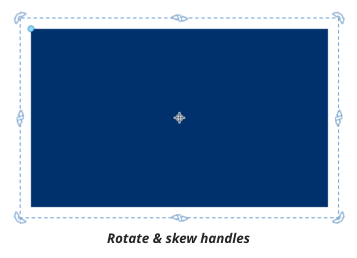
Rotate and Skew mode
If you click a second time on an object that is already selected, the selection handles change to show rotation and skew handles. Each time you click, the handles toggle between the two modes. You can also change this mode using the handle on the Selector Tool InfoBar. The skew operation used to rely entirely on dragging hidden handles near the stretch handles or on the InfoBar field, which only skews in one axis. It was too easy to drag the hidden skew handles by accident without realizing it, resulting in unwanted skew effects in a document. So the hidden skew handles have been removed completely and skewing by dragging is now only available in Rotate & Skew mode, using the new visible handles.SmartShapes & Photos
The Selector Tool only shows SmartShape handles that don’t interfere with the (now offset) transformation handles. This means that the Selector Tool handles now always work consistently, whatever is selected.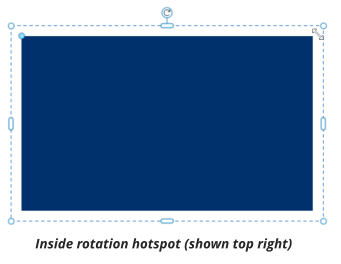

Page 25
Last updated November 21, 2023
The most significant result of this change is that photos can now be scaled and stretched by any of the
selection handles. Switch to the Quickshape Tool tool to see all the handles of a SmartShape and to the
Photo Tool to see all photo related handles.
Double-clicking on a SmartShape now switches to the Quickshape Tool where all its handles are always
available, just as double-clicking a photo switches to the Photo Tool.
Note the two different effects of dragging photo stretch handles:
•
In the Selector Tool stretching keeps the center of a photo in the center of the object and only
scales the photo if it needs to make it fit the new shape. This is the least intrusive way to stretch a
photo without distorting it and is appropriate when the photo is being stretched along with other
objects.
•
In the Photo Tool stretching the photo shape keeps the photo position fixed and only moves it, or
starts to scale it, if required to fill the shape. This is most appropriate when editing a photo on its
own.
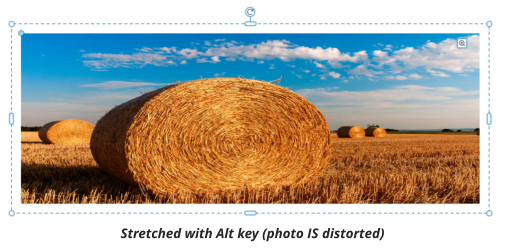
Stretching & Squashing
Wherever possible, stretching objects will stretch their outer shape and automatically reformat the contents to fit in the stretched shape, without distorting. For example when stretching a rectangular object that has rounded corners, the corners won’t distort, they’ll remain circular. This is called Smart Transformation and it prevents the introduction of unwanted or accidental distortion into documents. However, sometimes you may want to deliberately stretch both an object and its contents (e.g. to stretch/distort a photo or some text). It is now possible to stretch any object, including Text and Photos, by holding down the Alt key to disable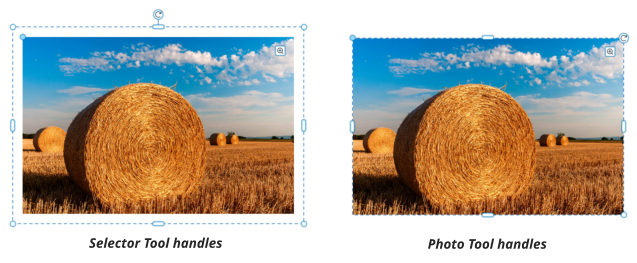
Page 26
Last updated November 21, 2023
Smart Transformation when dragging the Selector Tool’s stretch handles.
Other Selection Improvements
• The Selector Tool now shows the full width of a text column, instead of just the width of text in the column. This makes text columns consistent with text areas/boxes. • Serious error dragging Smart Duplicate handle on objects with Push applied. Fixed. • Selector Tool handles remain visible even on small objects on screen. Previously some handles were not shown at small on-screen sizes.Shape Editing Improvements
Another nice improvement for vector illustration has been made to the Shape Tool, is the introduction of an easy way to maintain the angle of the bezier curve when you drag its handles to change its length.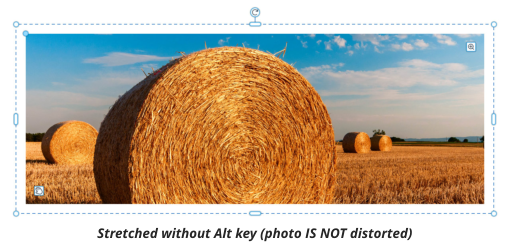
Page 27
Last updated November 21, 2023
Now when dragging a point or curve handle you can hold down Alt to constrain the movement of the
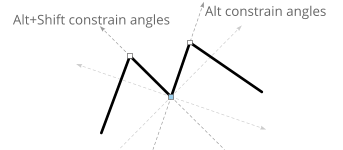
handle relative to its original angle with nearby points.
It works for both curve handles:
(the Shift key can also be used to balance the control handles around the selected smooth point)
and point handles in shapes with straight lines:
(In this case the Shift key chooses which of the two possible angles connected to the selected point should
be used to constrain the angle of the dragged handle. See the Online Help for more details.)
Make Repeating
Repeating Objects are used where you want the same object to appear on multiple pages of a document, in the same position on each page. They are most commonly used for page headers and page footers. Until now the only way to make an object repeating was to use the Arrange > Repeat on all pages operation. This makes a copy of the object on every single page of the document. This is great if you want the object on every page, but sometimes documents have more than one different page design and you may want one Repeating Object only on some of the pages and perhaps a different Repeating Object on other pages. Now there is a new operation Arrange > Make repeating, which simply makes the current selected object into a Repeating Object, without making any additional copies of it on other pages. Once you’ve done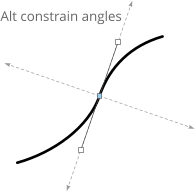
Page 28
Last updated November 21, 2023
this, you can then copy and paste the Repeating Object to whichever pages it’s needed on. Note that you
can achieve this very quickly by first selecting the target pages in the Page & Layer Gallery (use Ctrl+click
and Shift+click to select multiple pages in the gallery), then paste, and the object will be pasted onto all
the pages you selected.
Align Toolbar
The distribute options on the Align Toolbar (Window > Bars > Align) have been changed from Distribute centers, to Distribute equally spaced, which is more commonly used because it works well with objects of different sizes. The Arrange > Alignment dialog still includes the center distribution options.Other fixes and improvements
• Error sometimes shown moving mouse pointer over text inside shape. Fixed. • Resize of photo filled shape changed shape to rectangle. Fixed. • Serious error with repeating objects on guides layer. Fixed. • Opening color editor onto page color initially shows ‘no color’. Fixed. • Applying color to a page no longer turns on page shadow automatically. Page shadow can still be turned on/off in File > Page Options … . • Missing handles in Mold Tool. Fixed. • When replacing a color in an object, Xara will no longer preserve shading if there is only one shade of the color used. The user’s chosen color is applied directly instead. • Second and subsequent pastes of the same clipboard contents now work the same way as the initial paste (a list of formats to choose from is shown, if there is a choice). This means if you don’t like the results of the first format you choose, you can simply paste again and choose a different format, without having to re-copy from the source application. • Lock icons are now shown in an “unlocked” or “locked” state. • Bring to front / Put to back / Move forwards / Move backwards operations now work on objects inside groups. Objects are moved relative to other objects in the same group. • + handle disappeared on some SmartShape components. Fixed. • Serious error when applying elliptical transparency to a group. FixedImport & Export
As with every Web Designer release we continue to improve on our industry-leading file format support, the host of small improvements include: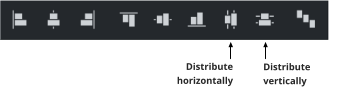
Page 29
Last updated November 21, 2023
•
Improved AI import, including support for more recent AI versions.
•
PDF form field import fixes.
•
SVG file with linear gradient failed to import. Fixed.
•
Overlapping text in exported SVG. Fixed.
•
TIFF import: Support for zip compression added
•
Serious error importing an AI file with missing data. Fixed.
•
PDF Import: Reconstruction of shape outline and shape fill into single shape.
•
Word document caused serious error on import. Fixed.
•
EPS import fix.
•
Docx file caused serious error opening in Web Designer. Fixed.
•
Inserting components via the Insert menu will always brand the components with the current
document styles and colors, without asking the user as previously.
•
Icon line widths wrong when replaced with SVG. Fixed.
•
Image export setting sometimes changed unexpectedly when page clipping option changed. Fixed.
•
Text copied and pasted from PDF reader has incorrect case. Fixed.
•
Serious error importing SVG file that has embedded WOFF2 fonts. Fixed.
Your Purchase Options & Xara Account
Multi-language support
The Designer titles now support English, German, French, Spanish and Dutch. When starting the application for the first time on a device, it will use the current language as defined in Windows. Thereafter you can change the language at any time using Help > Language (requires an application restart).A New Subscription Option
We’re happy to introduce a brand new subscription option. Our bundle of Xara Designer Pro+ and Xara Cloud is still available if you want to use these 2 great products together (for example if you are collaborating with a team on your documents, or need to access your documents remotely), but there is now also the opportunity to subscribe to just Xara Designer Pro+, Web Designer+ or Photo & Graphic Designer+. Tip: These options offer all the advantages of a subscription model, namely very frequent delivery of new features and content, as they are developed by Xara, and the fastest possible response to new compatibility issues and bug reports. You can always be sure you’ll have the latest version. What’s more the Plus options include the complete library of Xara content, templates and widgets (now called Xara Elements) and come with direct support from Xara, via chat.
Page 30
Last updated November 21, 2023
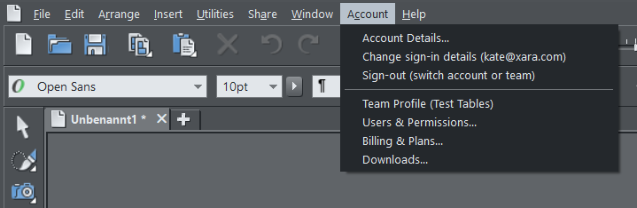
Managing Your Xara Account
The new Account menu has options to help you manage your copy of Web Designer. Account Details… All copies of Web Designer are associated with both an account email address and a team. This option shows you which account email and team you used to activate Web Designer. Change sign-in details This option lets you update the name or email address in your Xara account. Sign-out Use this if you need to re-activate Web Designer using a different account email or team, for example if you purchased Web Designer using a different email address or team to the one you used to activate the trial before purchase. Team Profile More information on the team that your copy of Web Designer is associated with. Users & Permissions… For managing your team members if your team includes more than 1 person. Billing & Plans Information on your current plan. Downloads Where you can re-download your copy of Web Designer.