V12 Headline New Features
Scroll through this document to see a description of new features in v12.
If you have an active subscription to Xara Web Designer+ purchased from Xara, then these updates are free. If
you are an owner of an older version purchased from Magix, then check out our current offers on upgrades.
You can find details on updates after November 2017 (v15) here.
Release Notes


Page 1
Last updated 21 - Nov - 2017

Contents
Update Service
2
Selection Improvements
3
Selector Tool Handles (Mar 2017)
3
Selection of Embedded, Anchored and
Repeating objects (Mar 2017)
3
Paste to selected pages (Mar 2017)
3
New Reveal Animations (Premium)
3
Scroll & Parallax Animations (Premium)
4
Parallax Scrolling
5
How to Use Reveal, Scroll and Parallax
Animations.
5
Stick at Top (Premium)
6
Example Websites
6
Improved Page Transitions (Nov 2016)
7
New Group export option (Mar 2017)
7
Full Width Photo Slider (Mar 2017)
8
SmartShapes
8
Improved SmartShape Editing
9
New Chart SmartShapes (Premium)
10
New Text Panel Designs
12
New Simple SmartShapes
13
SmartShape API for Developers
14
New SmartShapes (Nov 2016)
14
New Timeline SmartShapes (Mar 2017)
15
Photo Features
16
Smart Photo Straighten/Scale
16
Photo Grids (Premium)
17
Photo Hovers
19
Photo Filter Presets (Premium - July 2016)
21
Online Content Catalog Improvements
23
New Design
23
Keyword searching
24
Stock Photos (Premium - July 2016)
24
Stock Illustrations (Premium - July 2016)
25
Local Designs Gallery
25
Download Content to be Available Offline
25
Symbol Library
27
Automatic Updates
27
Symbol Search
27
Replace Symbol
27
Text Handling Improvements
28
Rectangular Repelling Option
28
OpenType Font Kerning
28
Change Case of Selected Text
28
Change Language for Entire Document
29
Bullet & Numbered Lists
29
Link to Heading (Nov 2016)
32
Vertically Aligned Text (Nov 2016)
32
Ligatures (Mar 2017)
32
Hidden Text Styles (Mar 2017)
33
Other Text Improvements (Nov 2016)
34
Page & Layer Gallery - Object Naming
34
Import/Export
34
Improved PDF import
34
Improved Word Import & Export (Premium)
34
Improved RTF Import & Export
34
Improved PowerPoint import (Mar 2017)
35
'Website M' Hosting, Free for 365 Days
35
Xara Online Designer - Beta
35
Other Content & Improvements
36
Update Service
We know that many of you find it frustrating to have to wait a whole year for our next update - knowing that we are working on (and likely finished) new cutting edge features and on-trend content. From our side, developing features for 12 months before they are released is equally frustrating. We would rather get features into your hands as soon as they are done. So we’re changing the model. We are moving away from yearly releases, and even from ‘headline’ version numbers. For the 365 days from purchase you’ll get access to new feature, updates and content. At the end of the 365 days you can choose to upgrade again, or not. If you choose not to, then the online services (the online Content Catalog) will be removed or restricted (these are online services anyway that would typically be part of a subscription). It’s important to note this is not a subscription service. Unlike other products such as Office 365, or Adobe Creative Cloud, the program you purchase is yours to keep, and will keep functioning with no further purchases, but after 365 days you’ll stop getting access to updates, new content, and the online services if you choose not to upgrade. This new approach also means features developed during the next year, which would typically be part of next year’s update, will be made available as soon as they are completed. So you’re getting next year’s features included in this year’s product. We believe this move away from once-a-year major updates, towards a more regular update process is better for our customers. The Update Service gives you 365 days access to: • The new Online Content Catalog, including any new templates, graphics and designs, photo filters and SmartShapes released during that time • New features, upgrades and patches to Designer Pro released in the 365 days after you purchase and register. Note: these updates continue to work after 365 days but if you reinstall the software after the Update Service expires (and you don’t renew) then it will be the same version and feature set as you originally purchased.
Release Notes
Page 2

Selection Improvements
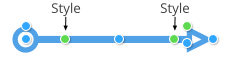
Selector Tool Handles (Mar 2017)
Now when you select a photo or SmartShape in the Selector tool, you see smart handles without having to first switch into the Photo Tool or Quickshape Tool, so you can directly edit these objects without having to switch tools. You can revert to showing the normal selection bounds handle using the toggle button on the left of the Selector Tool infobar.Selection of Embedded, Anchored and Repeating objects (Mar 2017)
When you embed a single object in text, you can now directly select that object in the text instead of selecting the “Embedded group” that encloses it. A similar improvement has been made for anchored objects, repeating objects and live copies.Paste to selected pages (Mar 2017)
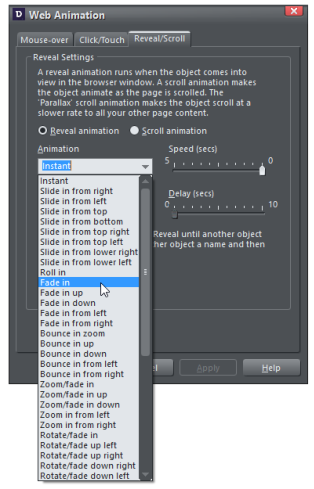
You can now paste the contents of the clipboard to any number of pages in your document. Simply select the pages you want to paste to in the Page & Layer Gallery. Ctrl+click on a page thumbnail to add it to the selection, or use Shift+click to add a range of pages to the selection. Then paste (Ctrl+V). This is especially useful if you have copied a repeating object that you only want on some pages of a document.New Reveal Animations (Premium)
40 new reveal animation types have been added to the Reveal/Scroll tab of the Web Animation dialog (Utilities menu), in addition to the simple slide and fade animations that were in Designer 11. Reveal animations happen as you scroll, or reveal, parts of the website. It’s a fashionable effect that can highlight specific content and makes websites more interactive and fun. But in addition to all the new animation types we’ve added scroll-linked animations and parallax scrolling effects.
Release Notes
Page 3

Release Notes
Page 4
Select the item you want to animate on reveal, and
the menu Utilities > Web Animation… to show this
dialog. There are now two options; Reveal or Scroll
animations.
This shows the drop-down list of some of the possible
reveal animation types. The top option ‘Instant’ is the
same as no reveal effect.
Reveal animations are triggered when the item is first
shown in the browser. The speed slider controls how
fast this animation (how many seconds it takes).
There’s a ‘Once only’ check box to control whether this
reveal animation happens every time the items is
revealed (e.g. when scrolling it off and then back on
screen) or just the first time.
An alternative to reveal animation are scroll
animations.
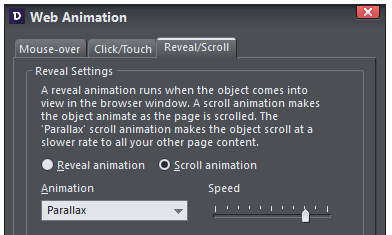
Scroll & Parallax Animations (Premium)
Scroll animations are similar to reveal animations, but the position on the page (or other values such as the amount of fade) is linked to the scroll position. The more you scroll a page, the further the animation moves. This also means the faster you scroll the page, the faster the animation happens. Instead of the animations running once when the object first appears and then finishing, the object animates whenever the document is scrolled.
Release Notes
Page 5
When you select the ‘Scroll animations’
option, from the same Reveal/Scroll tab
of the Web Animation dialog (menu
Utilities > Web Animation…) the top
item in the drop-down menu is called
‘Parallax’ followed by a long list of
alternate scroll animations.
The ‘speed’ slider determines how fast
the animation runs relative to the
scrolling speed. So if it’s set to a high
value the animation completes quickly,
almost as soon as you scroll it up into view, so the object will only be animating when it first appears close
to the bottom of the window. If speed is set to a low value, the object won’t complete its animation until it’s
scrolled much further up the window.
Note that you can’t have a scroll animation on a sticky object or an object set to ‘stick at top’.
Parallax Scrolling
Parallax scrolling is where some objects on your page scroll at a different rate to others, giving a parallax effect. The ‘Parallax’ option appears at the top of the list of scroll animation types. The speed slider determines how fast the object scrolls relative to other objects on the page, with values between 100% (moves same as normal objects) and 0% (which means it sticks on the page). So with a midway setting, items will scroll 50% of the usual scroll speed. If set very low, the object hardly moves at all as other objects scroll past it. If set very high the object scrolls at almost the same rate as the other page content. So the most useful speed values are towards the middle, but you can experiment with different speeds. Note: If you have a low parallax scroll speed, items below the bottom edge of the browser window may never appear.How to Use Reveal, Scroll and Parallax Animations.
Select the item you want to apply the animation to. Select the menu Utilities > Web Animation… and the Reveal/Scroll tab and one of the options described above. When experimenting it’s best to click Apply on this dialog, because this keeps the dialog on screen so and you can change the selection or change options and just click Apply again, instead of having to bring the dialog up every time you want to make a change. To see the animation in operation click the ‘Preview web page’ icon on the top line of icons. This opens a web browser to preview the animation. You can open the page in any installed web browser by clicking the appropriate browser icon in the preview window.
,

Release Notes
Page 6
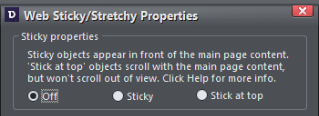
Stick at Top (Premium)
Web Designer 11 allowed you to make an object ‘sticky’, which means it floats above other page content and is positioned fixed relative to the browser window, so it’s always in view. There is now a new ‘Stick at top’ option (menu: Utilities > Web Sticky/Stretchy) an alternative way of keeping objects such as navigation bars in view. A ‘Stick at top’ object starts off on the page where you place it, and scrolls with the page just like all your other page content. But instead of scrolling off the top of the window, the object sticks to the top of the browser window and so stays in view. Therefore it’s great for navigation bars. An example website with a ‘stick at top’ NavBar. This will remain at the top of screen no matter where you scroll in the document.Example Websites
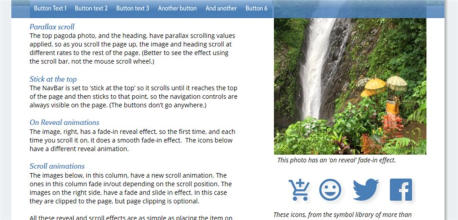
Example 1: Charity website A contemporary design combining parallax scrolling, with multiple scroll and reveal animation effects. This is also a responsive website - make the browser narrow to see the mobile variant. Example 2: Able website A ‘stick at top’ NavBar, and slide-in reveal animations on the header bar. There are 6 pages to this website each with different examples of animation effects. Example 3: Fresh single page website A reveal animation for the heading, a ‘stick at top’ NavBar. Lower down the page there are various new hover (mouse-over) effects in a few picture galleries and a roll-in animation applied to the new Percentage ring SmartShape. Example 4: Pagoda single page website. Shows parallax scroll on the top image and heading. Has a number of scroll based animation effects. Read the description in the file for more info.

Release Notes
Page 7
Improved Page Transitions (Nov 2016)
Page transitions (animation shown when moving from one page to another in a web browser) have been improved so that they are smoother, more reliable and more consistent across the different web browsers and devices.New Group export option (Mar 2017)
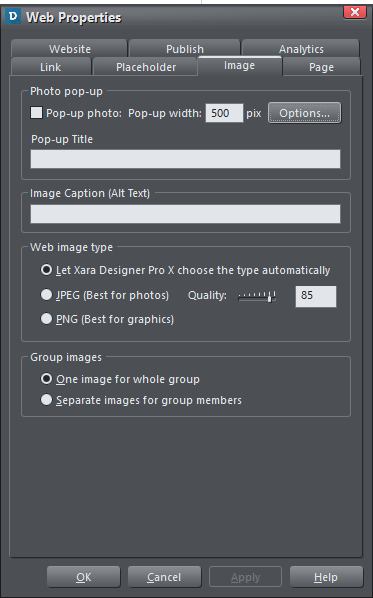
Normally if you group multiple objects together, those objects are exported as a single image in your published website. For example if you group a photo with its caption text, the whole group, photo plus text, appears as an image in your website, so the text is not selectable in the web browser. Now there is a new option to control how groups are exported, in the Utilities > Web Properties dialog, in the Image tab. See the Group images section at the bottom of the dialog. By default, existing groups and new groups are set to One image for whole group, so groups will export to your website as with earlier versions of Designer. But if you change the setting to Separate images for all group members, then the grouped objects will export individually as if they were not grouped at all. It’s not advisable to use this new option on very complex groups such artwork that is made up of tens or even hundreds of vector shapes. It’s more efficient for such groups to export into the website as a single image, as with earlier versions of Designer. But for simpler groups such as a group of photos, it’s best if they are set to export separately because then each object can have its own individual settings. For example each photo could be set to be a popup, or have its own reveal animation.
Release Notes
Page 8
And it’s especially useful for groups containing text, so the text remains as text in the published site.
Once you have changed this new property on a group, so it’s set to Separate images for group members,
Designer will then allow you to set properties on the objects inside the group. You can use Ctrl+click to
select objects inside the group and then apply links, reveal animations, etc. to the objects.
Full Width Photo Slider (Premium - Mar 2017)
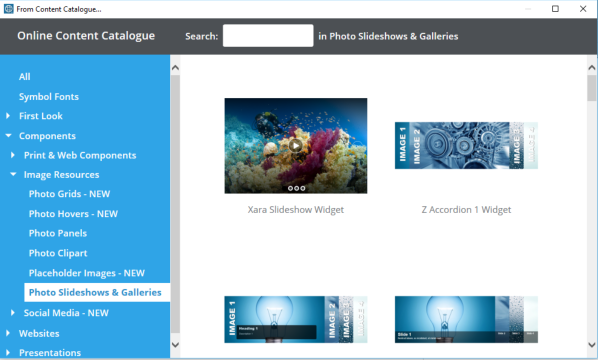
The Xara Slideshow widget (the first item in folder Components > Image Resources > Photo Slideshows & Galleries) now supports the option to make the photos span the full width of the browser window. To turn this option on, right-click on the widget on the page, choose Web Sticky/Stretchy… in the context menu and turn on the Full Width option in the Sticky/Stretchy dialog.SmartShapes
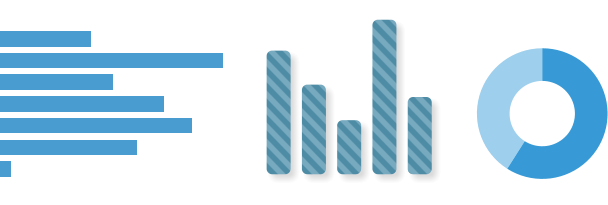
There are significant enhancements to the SmartShape system and new SmartShapes that are a lot more powerful and complex and begin to show the real power of this system. New chart and photo grid SmartShapes SmartShapes are a way enhanced functionality can be added to Designer. SmartShapes are plug-ins. We (and soon third parties) will continue to release new SmartShapes. Each SmartShape incorporates its own editing controls, usually in the form of small handles you drag to adjust the shape. Although there are simple SmartShapes that are just a single shape, such as the arrow designs, the underlying SmartShape architecture now supports much more complex examples, including charts and percentage segment indicators, grids of photos that can be customized and improved smart text panels.

63%
201
576
408
271
486
Alpha
Bravo
Charlie
Delta
Echo
Release Notes
Page 9
Some examples of percentage segment SmartShapes.
Enter a new value and the chart adjusts. Or drag to on the chart and the value adjusts.
These SmartShapes are automatically matched to your website Theme Color
SmartShapes are entirely self-contained. No new tools are required. You just double-click on the
SmartShape to reveal its editing controls.
Bar & Column chart label and value text (Mar 2017)
Now when you change the appearance of a chart label, such as changing the font, font size or color, that change is immediately replicated across the other labels for each bar. However this only happens if those other labels have the same text style applied (usually “Bar chart labels”). So if you want one of the labels to be different, perhaps to highlight one of the bars, simply give it a different style or use the No style option in the styles menu to remove the style. The same happens with the value text.Improved SmartShape Editing
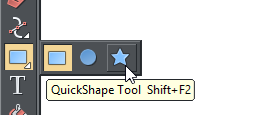
Web Designer now shows larger and clearer handles on SmartShapes when editing. You can edit SmartShape simply by double-clicking on the shape in the Selector tool. Alternatively, select them using the QuickShape (or rectangle or ellipse) tools from main tool bar. When selected the SmartShape will show a set of control handles on and around the shape, like this:
40%
70%
59%
Release Notes
Page 10
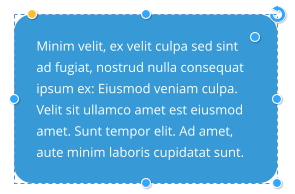
This is a simple Text Panel SmartShape. The blue circular
handles on the sides allow you to stretch the panel to be
any size. The top right corner handle will rotate the
whole object. The bottom right will enlarge or reduce the
size of the whole SmartShape.
Each SmartShape has its own set of control handles.
Hold the mouse-pointer over any handle to get a tool-tip
hint of the function of each. The Status Line (bottom of
window) also provide some description of the function of
each handle. In this example the top left orange handle adjusts the rounded corner of the panel
background (and most rectangular SmartShapes have a similar function). The inset handle at the top right,
in this case, adjusts the margin around the text.
This percentage segment SmartShape has controls to drag either end of the
segment (doing so will update the value), or using the text Tool you can edit the
value, in which case the segment bar is changed. The handle mid-way around
the arc allows you to adjust the thickness of the band.
The top right handle will rotate the whole thing, the lower right will resize it.
SmartShape Handle Mouse Pointers (Mar 2017)
Improved mouse pointers shown over SmartShape handles.New Chart SmartShapes (Premium)
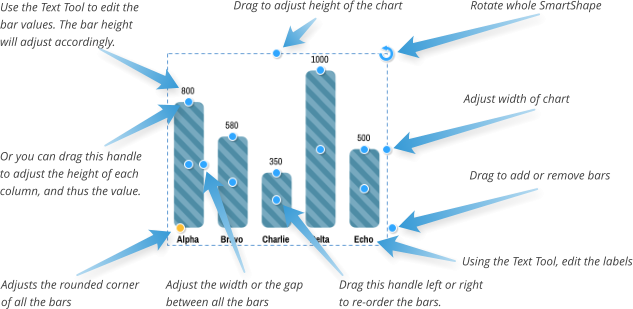
The Online Content Catalog includes new charting SmartShapes, with bar, column charts and a variety of circular ‘percentage’ indicators. The menu Insert > Charts is a short-cut to the chart category in the Online Content Catalog. You can just edit the values and labels on the charts using the Text Tool and the graphics update accordingly. Or you can drag the graphics and the values update.

Release Notes
Page 11
As with all SmartShapes, double-click on the SmartShape to go into the QuickShape tool and reveal the
control handles.
Instead of complex dialogs, or charting tools, almost all aspects of chart SmartShapes can be adjusted by
simply dragging on the control handles, or directly editing the labels and values. Below is an annotated
diagram of the controls.
Move the mouse pointer over each handle for a tip on what each does.
Entering precise chart values: You can drag the bars to adjust the value. If you need more resolution or
accuracy, just zoom in and drag. Alternatively you can enter any precise numeric value, even with decimal
places, using the Text Tool.
576
1420
720
1047
1222
871
462
Alpha
Bravo
Charlie
Delta
Echo
Foxtrot
Gamma
800
580
350
1000
500
Alpha
Bravo
Charlie
Delta
Echo
59%
Release Notes
Page 12
The example chart SmartShapes are quite simple, but we anticipate that we, and third parties, will release
more powerful charting SmartShapes over time. These will just appear in the Content Catalog as we make
them available.
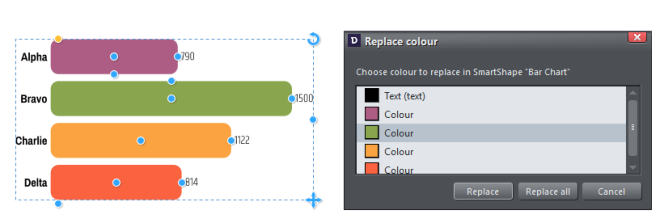
Customizing Bar & Column Chart Colors and Text
You can change the colors of charts easily just by selecting the whole chart and clicking a color on the color line or dragging a color onto the SmartShape. The Replace Colors dialog appears to let you choose which of the colors in the chart you would like to replace with your chosen color. Alternatively the Color Editor to edit the colors - the list of replaceable colors appears at the top of the color editor, so select the color you want to edit from that list. Sometimes you may need to do more than just replace or edit the existing colors in the chart. You can select a specific bar or column inside the chart using the normal ‘select inside’ short-cut of Ctrl+clicking on it in the Selector Tool. That selects just that bar/column inside the chart. Then you can change its color directly, or its outline, or even change the type of its fill using the Fill Tool. If you want to copy the style of one bar onto the other bars, first copy (Ctrl+C) the selected bar to the clipboard. Then select one of the other bars and use Edit > Paste > Paste format/attributes or the simpler short cut Ctrl+Shift+A.Changing Label and Value Text Styles
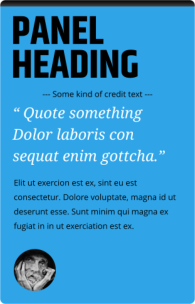
The Chart labels and value can be edited using the Text Tool. You can apply the usual text attributes, to adjust the appearance of the text. Both the labels and values have separate Text Styles applied, and so by using the usual Text Style update to apply any style change to all the labels or values. (From the InfoBar menu of the Text Tool, select the Style drop-down and select ‘Update Style to Match’).New Text Panel Designs
In the Online Content Catalog you can find some new Text Panel SmartShapes (short cut menu Insert > Shapes > More Text Panels… but they are also under the Components > Print & Web Components in the Content Catalog.
Release Notes
Page 13
These text panels are smart in that they grow to accommodate whatever
text you put in them - you can freely edit the text using the Text Tool. If
you display the SmartShape controls (double click on it using the Selector
Tool or the QuickShape tool) you can adjust the width and height (and the
text re-flows), the margins around the text and the corner roundedness
of the whole panel. You can also rotate the whole object and it remains
fully functional.
In addition we have a collection of similar panels containing photo and
text. You can find these in the Online Content Catalog under Image
resources > Photo Panels.
New Simple SmartShapes
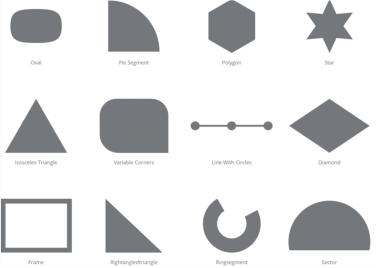
There are new simple SmartShapes available from the Online Content Catalog under Shapes category (Short-cut menu Insert > Shapes > More Shapes…) In the Selector Tool, double click to show the SmartShape handles. Each of these is a customizable by dragging on these handles in the usual SmartShape way. You can apply colors and different fill styles, outlines, shadows, transparency etc, and they will remain fully editable using the SmartShape handles.
Release Notes
Page 14
SmartShape API for Developers
SmartShapes are a way of extending the functionality of Designer series of applications. The examples shown here are just a sample of what’s possible. If you’re a developer we’ll soon be releasing the plug-in API so you can start adding your own SmartShapes - or just enhancing the existing SmartShapes, as we expect to release the source code of most of the SmartShapes we’ve created. SmartShapes are written in JavaScript and run in both the desktop Web Designer and also (soon) Xara Online Designer. If you’re interested in learning more about this, email us at smartshapes@xara.com and we’ll make sure you get information when we launch this to the outside world.New SmartShapes (Nov 2016)
Chevron Bar
The new Chevron Bar SmartShape (Insert > Shape > Arrows…) is particularly useful in presentations. Drag on the different handles to add/remove chevron shapes, re-order, change the arrow angles, etc. And of course just click on the text in the Text Tool to edit the labels.New Arrows
Most of the arrows in the arrows folder (Insert > Shape > Arrows…) can now be changed to use a variety of different head and tail designs. Click or drag on the green style selection handles to cycle through all the available styles.


Release Notes
Page 15
New Timeline SmartShapes (Premium - Mar 2017)
Timelines are common in many types of documents and particularly in presentations. The Timeline Smartshape consists of a line with an object (or group of objects) repeated along its length with regular spacing. You can increase or reduce the number of objects on the line, adjust their spacing, size, vertical alignment, etc. using the SmartShape’s handles. To insert a Timeline, use Insert > From Content Catalog > Components > Print & Web Components > Timelines.Timeline Handle Summary
End handles Drag either end to change the length of the line, or rotate the whole line Spacing Drag to adjust the spacing of the objects on the line and therefore determine how much of the line sticks out on each end. Add/Remove Click to add a copy of the rightmost object, or drag to add or remove multiple objects. If nothing happens when you try to add a copy, that means there is not enough space on the line to fit another copy. Try reducing the size of the objects using the Size handle, or extending the line length by dragging it out. Vertical offset Drag to adjust the vertical positioning of the objects on the line. Delete Delete an object from the line. Line width Drag to adjust the width of the line Size Change the size of the objects on the line.Text Editing
Many of the timelines include text, which of course you can edit using the Text Tool. If you find you can’t fit the text you want into the space available, try increasing the size of the objects on the line using the Size handle and then select the text and reduce its font size, so you can fit more text in. If the change the fontSymbol Replacement
Some timelines include symbols that you will want to replace. Select the symbol inside by holding down Ctrl and clicking on the symbol. Then right-click and choose Replace symbol… from the context menu.

2014

2015

2016

2017
Release Notes
Page 16
Photo Features
Smart Photo Straighten/Scale
The Photo Tool includes a new ability to more easily scale, rotate, crop and pan clipped images within their frame. This also makes it much easier to straighten the horizon on images without introducing gaps in the corners, to create rounded corners on your photos, and to adjust the shape of your photo frame without distorting (stretching) the photo. In the Photo Tool click on a photo to show a set of new control handles, some around the outside edge of the photo, some inside, on top of the photo: As with SmartShapes, hold the mouse pointer over any handle to reveal a pop-up tip for that handle. If the image is made larger than the frame (in other words clipped), which can happen if you reduce the edges of the frame inwards, or use the rotate/scale handle in the top right to enlarge the image, then the ‘hand’ control can be used to re-position the image within the frame. There are numerous benefits to this new method of manipulating photos:. • It’s super-easy to to scale and rotate the image within its frame, (like a masked operation) directly from the Photo Enhance Tool. • Drag the outer top right corner to rotate the whole image (frame and photo). • Both rotate operations (internal and whole image) display the rotation angle as you rotate. • The side handles can be used to change the shape (aspect ratio) of the photo, but the image is never stretched - it is scaled, keeping the correct aspect ratio, to fit whatever frame size you want. • Dragging the side handles inwards clips (masks) the image within the frame. Use the ‘hand’ to re-

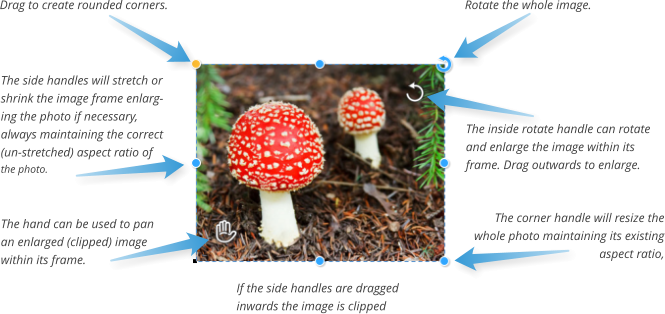
Release Notes
Page 17
position the clipped image within the frame.
•
It’s easy to adjust the horizon of landscape images, without introducing gaps in the corners.
•
It’s easy to give any photo an rounded corner.
•
If you rotate the image, all these operation remains functional
You can still use the Fill Tool to manipulate a photo fill, which works the way it always has.
To reset a photo back to its ‘best fit’ state, double click on the rotate/scale handle. To center the image in its
frame, double click on the ‘hand’ icon. To un-clip an image double-click on one of the side handles.
These smart photo operations also work with photos of any shape, not just rectangular photos and with
photos within groups and Soft Groups.
Updates (Nov 2016 / Mar 2017)
Smart photo editing has been improved so that as you drag the handles to adjust an image, a faint copy of the full uncropped image is shown behind. This makes it easier to make adjustments because you can see parts of the image that fall outside the crop area, as you drag the handles. Also (Mar 2017) Smart Photo now behaves better with photos that don’t already fit into their frames (there are unfilled gaps) - it no longer attempts to immediately remove the gaps as soon as you drag on a handle, making small adjustments possible.Photo Grids (Premium)
There are two new types of Photo Grids, which are a compact array of photos: Static Photo Grids, and Smart Photo Grids. You can find these in the Online Content Catalog under Components > Image resources > Photo Grids. Static Photo Grid examplesStatic Photo Grids
These are aesthetically pleasing arrays of photos, but in a fixed arrangement. You can replace any photo by

Release Notes
Page 18
dragging a photo file (typically a JPG or PNG) from your Windows file explorer on top of any image in the
grid. You can then use the new photo tools described above to adjust the image with its frame, but it’s not
recommended you change the crop or size of the individual images.
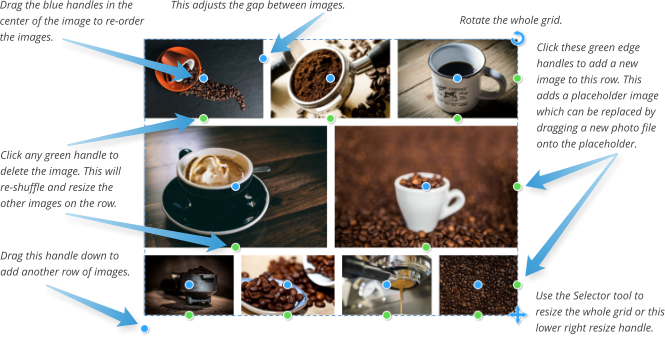
Smart Photo Grids
This is a more flexible SmartShape that lets you display any collection of photos, even those with different shapes and aspect ratios, in a compact grid. You can adjust the number of photos on each row, or number of rows, drag re-order the photos, and adjust the gap between all the photos. To show these SmartShape control handles, double click on the grid, or use the QuickShape Tool (Shift+F2). In the Online Content Catalog (Menu Insert > From Content Catalog.. and select the category Components > Image resources > Photo Grids). All the SmartShape photos (as opposed to the Static ones) have ‘smart’ in the title. You can also use the new Photo Controls on individual images, by going into the Photo Tool and clicking on an image. Each time you replace an image, it puts you into this Photo Tool mode. To get back to the SmartShape handles use the QuickShape Tool (Shift+F2) or go back to the Selector Tool and double click again. Adding & Replacing Images To replace an image with your own photo, just drag and drop a photo file from Windows Explorer (or from the Bitmap Gallery if the photo is already in the current document). The image in the grid that you drop
Release Notes
Page 19
onto is replaced with your photo and the grid automatically updates to fit your photo in. In this first
release you can’t adjust the crop of images within the grid, but we hope an update to SmartShape photo
grids will address this.
To add more images click the green ‘Add photo’ handle on the right end of each row, or drag the
‘Add/Remove rows’ handle at the bottom left of the grid to add a complete row.
Note, The height of a row is calculated by fitting the number of images in this row into the width of the grid.
So the more images per row, the less tall that row is, especially if the images are wide such as panorama
photos. Similarly rows containing just a single image will usually be taller.
Border
There’s a Border width handle on the top left photo in the grid that lets you adjust the space between each
photo. You can have no space at all if you choose, but when you do have a border it’s simply empty space
between the photos so you see whatever is behind your photo grid. Therefore if you want to see
something other than the page background behind, just draw a rectangle behind and set its color or fill to
give the border effect you would like.
Thumbnails, Pop-ups, Reveal Animations
It’s likely you will want your photo grid to have pop-up functionality on your website (so clicking on an
image in the grid will pop-up an enlarged version) or perhaps one of the new reveal or scroll effects. You
can apply these effects to the whole Photo Grid in one go, and it will be applied to each of the individual
images. E.G. select the grid, open the Web Properties dialog, Image tab, and check the ‘pop-up photo’
checkbox (and adjust the pop-up options as required). Click Apply and now each image in the grid will pop-
up when clicked on your website.
Advanced: You can apply different effects to an individual photo in the grid by selecting ‘inside’. in
the Selector tool hold Ctrl and click the photo, now apply the required effect to this individual photos.
If you re-apply, or even adjust the effects to the whole grid again, it will overwrite any individual
settings.
More Grids Added (Nov 2016)
In Nov 2016 we added 23 new photo grids, and a new folder structure to make it easy to locate just the right grid for your web page.Photo Hovers (Premium)
In the Online Content Catalog (Components > Image Resources > Photo Hovers) there’s a small selection of ready-made images combined with a mouse-over (often called hover) effects. As your hover over the image on the website, it fades in a layer of text with a message, typically on a semi-transparent colored background.
Release Notes
Page 20
The first six example are these new hover effects. Other items in this folder are older hover Widget objects,
that work a different way. The following applies to the Link and Pop-up examples. As the name implies the
‘link’ example have a link on the photo. The ‘pop-up’ example show a large pop-up when clicked.
A normal image, left, reveals a message as you mouse-over it, right.
To see the effect it’s necessary to preview you website, the usual way, by clicking the Preview Page
icon on the top line. Move the mouse-over the image to preview the animated effect.
To replace the image
Just drag a replacement image file from your Windows file explorer on top of the image. this will jump you into the Photo Tool afterwards where you can use the new scale/rotate feature and of course any of the Enhance effects on your photo. Note though, it’s not recommended that you crop the photo as the mouse- over panel will not be cropped to match. Of course you can resize the image as required using the Selector Tool.To edit the text or message
The message text and overlay effect is on another layer that has to be enabled in order to see and edit. Using the Page & Layer Gallery expad the page section to view the layers. You’ll see a MouseOff and a MouseOver layer, something like this: To switch on the MouseOver layer, just click the red eye icon highlighted above. This shows the mouse-over layer, where you can use the text Tool to edit the message as required. Hide the mouseover layer again when you’re done editing.How to change the link URL
If you just select the items in the Selector Tool, (the MouseOver layer must be hidden) a pop-up link windows appear under the photo. Select the ‘change’ option which opens the link dialog.


Release Notes
Page 21
Advanced: This is just a Soft Group of a collection of objects, with a MouseOver layer containing the
mouse-over animated effects. The Link or photo pop-up effects is set on the photo.
Photo Filter Presets (Premium - July 2016)
Photo filter presets allow you to instantly apply ready-made photo effects to your photos. The presets are provided in the Online Content Catalog under Components > Image Resources > Photo Filter Presets. You can apply them directly from the Content Catalog by selecting the photo and then choosing Insert > From Content Catalog. Below are are just a few examples of available effects, applied to the same photo for comparison.Using Presets From the Local Designs Gallery
Once you’ve imported one preset, you can optionally download all the presets to your Local Designs Gallery, for easier access. Open the Local Designs Gallery and navigate to the corresponding folder: Components > Image Resources > Photo Filter Presets. Right click on the folder name and choose Download All. The folder closes once it has downloaded to your disc. Re-open the folder and now you can drag and drop any of the effects onto your photos, or select the target photo and double click an effect in the Gallery.Using Multiple Filters (Mar-17)
Prior to the Mar-17 update it was only possible to apply a single filter to a photo. If a different filter was applied to a photo that already had a filter, the old filter was removed and the new one applied instead. Now there are multiple different ‘classes’ of filters and overlays that can be applied together. The set of filter presets is divided into two folders under Photo Filter Presets. The Filters folder contains presets that affect the overall look of your photo. It would not be useful to apply more than one of these presets to a photo and so these will replace each other. In other words, only one of these presets can be applied to a photo and applying a second will automatically remove the first.

Release Notes
Page 22
However the Overlays folder contains various different classes
of presets that can be applied in addition to any of the presets
under the Filters folder. So for example this photo on the left
has had the Softlight filter effect applied from Filters > Effects
and also the Stripes pattern, from Overlays > Patterns.
Each of the presets in the same sub-folder under Overlays will
also replace each other, because it wouldn’t be useful to have
for example two different patterns applied. But you can mix
presets from each of the other folders under Overlays as much
as you like. So you could for example apply a check pattern
from the Patterns folder, a texture from the Textures folder
and a transparency effect from the Transparency folder all to
the same photo.
Photo Filter context menu (Mar 17)
When you right-click on a photo, you will see a Photo Filter option in the context menu that appears. This
option has a sub-menu, which allows you to apply filters to your photo and remove filters that are already
applied.
The Apply filter… option opens the Content Catalog onto the Photo Filter Presets folder so you can apply
a filter to the selected photo. Following this option in the menu, you will see Remove options for each of
the filters you currently have applied to the photo, so you can remove any of them. The final option in the
menu allows you to clear all applied filters from the photo.
Transparency Effects (Mar 17)
The overlay effects under Overlays > Transparency work by applying transparency effects to your photo directly. You can see and modify these effects by selecting your photo and going into the Transparency Tool .


Release Notes
Page 23
More Filter Presets Added (Nov 2016)
In Nov 2016 we added 50 more new photo filter presets. The set of available presets is now separated into sub-folders in the Content Catalog, but you can still download all of them to your Local Designs Gallery as described above, for easy access.More Filter Presets added (Mar 2017)
Approximately 40 additional presets were added in this update, including transparency effects and the ability to apply multiple classes of filter to a photo, as descibed above.Online Content Catalog Improvements
New Design
An enhanced Online Content Catalog is included free for one year as part of our new Update Service. It now offers:- • Regular updates to the templates as part of the Update Service • Full keyword search of the entire catalog • A new more logical structure to the content offering a better work flow • Brand new Stock Photos and Stock Illustration sections - see below.
Release Notes
Page 24
Keep Content Catalog Open After Selection (Nov 2016)
Normally when you click on the Import button over the item you’ve chosen in the Content Catalog, the item is imported and the Catalog window closes. Now if you hold the Shift key down when clicking Import, the item is imported and the Catalog is kept open. This is useful if you want to try out several different items without having to keep re-opening the Catalog.Keyword searching
All content is now searchable, making it much easier to find templates and components to add to your document or website. Select a category folder on the left and then enter a keyword in the search field to search in that category only. Or select ‘All’ on the left to search all available content.Stock Photos (July 2016)
This is unlike most stock photo libraries you may be used to, where you purchase a ‘royalty free’ image, with restricted license terms, often with limited production runs, limited reproduction rights, no re-distribution rights. An increasing number of photographers are submitting their work to the public domain, in particular under a license called CC0, which is a very liberal license, totally royalty free, where you can use the image for personal or commercial use with almost no limitation. Read more about the CC0 license. In conjunction with Pixabay, a website that collected and collated a huge number of high quality CC0 images, we have included a section in the Content Catalog where you can search and download hi-res photos directly into Designer. Their collection includes high-quality images from sites such as Unsplash.com and other collections of CC0 licensed content. The first time you import one of these photos you will be asked to read and accept Pixabay’s Terms & Conditions. But you only need to do this once on each computer you use, then you can import as many photos as you like.


Release Notes
Page 25
Stock Illustrations (July 2016)
In addition to stock photos, there’s now an additional category of vector graphic ‘stock illustrations’. All the images have keywords so you can easily search for the graphic you want. Select the Stock Illustrations category on the left side and enter a search term, such as Frog - see left. Because the original vector files vary enormously in size, graphics larger than around 300px are scaled down. Also un-grouped images, are placed in a group for ease of manipulation. Because this is vector clipart, it’s re-sizable to any size without loss of quality.Local Designs Gallery
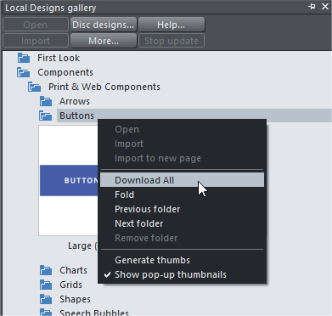
The Designs Gallery has now become the Local Designs Gallery. As the name implies, this now shows only content that you have present locally on your device, either because it was installed with the program using the optional backup CD, or was downloaded from the Content Catalog. This makes it easier to find and access designs you use regularly. The folder structure in the gallery still mirrors that of the Content Catalog and each folder in the gallery has a link allowing you to jump straight into the corresponding folder in the Content Catalog, so you can easily view what other content is available for download into that folder. Whenever you open or import a design file from the Catalog, that file then appears in the Local Designs Gallery and so you can use it even when offline.Download Content to be Available Offline
As just mentioned the Design Gallery (right edge of the window) now shows content that has been previously downloaded, that is cached on your local hard drive. This is therefore available while working offline. For example if you download a button from the Online Content Catalog (from Components > Print & Web Components > Buttons) then there will be a corresponding category created in the Local Designs Gallery.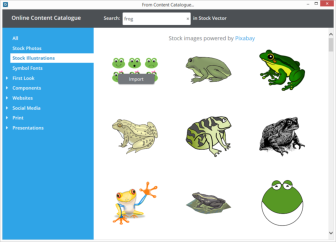
Release Notes
Page 26
You can download the whole category (in this case
all the button designs), so they all available offline,
by right clicking on the category name, and
selecting this ‘Download All’ option.
Release Notes
Page 27
Symbol Library
We’ve added Google’s Material Designs symbol font to the symbol picker (menu Insert > Symbol… and also from the Content Catalog) to provide over 1500 high-quality open-source vector symbols. These can be used as an editable vector graphic on the page, or used as an inline symbol font character in text. To insert the symbol in the text, in the Text Tool, just place the text caret where you want to insert the symbol and select the symbol from the picker. If you insert the symbol on the page, it’s created as a simple vector shape. You can adjust its fill, shadow, outline.Automatic Updates
The Font Awesome and Google Material Design fonts are updated quite regularly with new symbols. When this happens you’ll get a font update prompt when you open the symbol picker. It’s important that you choose to accept these updates because the symbol picker and Content Catalog always show symbols from the newest font versions, so if you’re not up to date you may find symbols you choose appears as a black rectangle.Symbol Search
The symbol library is now searchable - enter a keyword in the search field at the top of the symbol picker to find matching symbols in any of the symbol fonts supported. e.g. search for ‘face’ to find all Facebook icons, or ‘credit card’ to find all credit card designs.Replace Symbol
To replace a symbol, right-click on it and choose Replace symbol… from the context menu. This brings up the symbol picker, where you can search for a new symbol. You can also use this operation in bulleted lists to replace the symbol used for the bullet points. Place the text caret in the list, right-click and choose Replace symbol…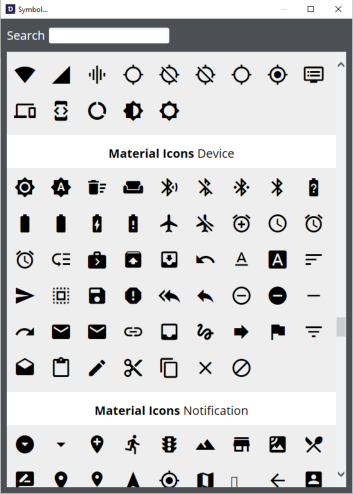
Release Notes
Page 28
Text Handling Improvements
Rectangular Repelling Option
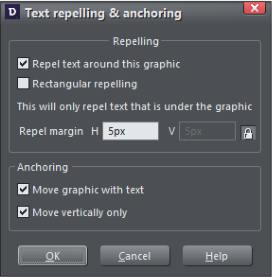
If you make a non-rectangular object repelling, by default the text flows tightly around the object, following its outline, as demonstrated by this ellipse on the right. Now you can choose to make the text repel around the rectangular bounding box of the object instead, ignoring its outline, as for the second ellipse below left. This rectangular repelling option is also more efficient if your document or website has long text flows and has a lot of repelling objects that are also anchored to the text (as both ellipses here are). Therefore this is now the default option when you turn repelling on for rectangular objects. Non- rectangular objects, such as the above ellipses. You can control the repel margin - how close the text comes to the edge of the repelling object. You can access this dialog by right clicking on the item to repel, and selecting the Repelling & Anchoring… option, which also appears under the top level Arrange menu. In addition to the repelling options for floating or anchored images, there are ‘in-line’ wrapping options. Just paste an image inline into the text, resize as required, and right click and select the ‘Embedded graphic options..’. This dialog on the right is an example of an embedded graphic set to ‘wrap text left’ .OpenType Font Kerning
Auto-kerning (the small adjustment of the overlap of certain pairs of letters such as ‘Aj’) in earlier versions of Designer works only with older TrueType fonts. Work has been done to support kerning on newer OpenType fonts, so now many newer OpenType fonts now render with the correct kerning. Most modern web browsers also automatically support the correct auto-kerning.Change Case of Selected Text
Right-click on a text selection in the Text Tool and choose from the new Change case to… sub-menu in the context menu.


Release Notes
Page 29
Change Language for Entire Document
The spell-checker menu now includes options to change the language of all text in your document at once, instead of having to set each text object separately.Bullet & Numbered Lists
Extended List Properties Dialog (Nov 2016)
The List Properties dialog has been extended so that it now gives you much more control over how your bulleted and numbered lists are presented, so it’s now much easier to get lists looking how you want. To bring up the dialog, place the text caret in the list or sub-list that you want to modify, right-click and choose List properties … from the context menu. The dialog is non-modal and all the changes you make are applied immediately, so you can move the text caret to different lists/sub-lists at any time. The first two fields in the dialog are as in previous versions of Designer and allow you to change the number format and starting values in numbered lists.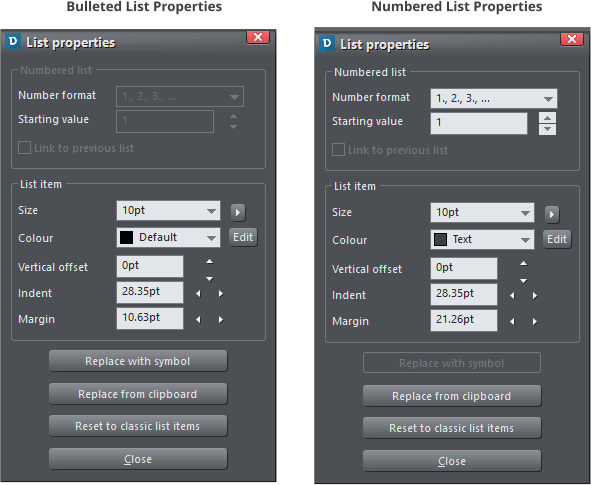
Release Notes
Page 30
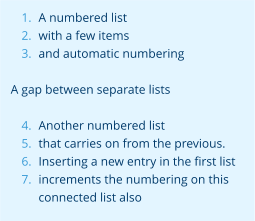
Link to previous list of the same level (Nov 2016 & Mar 2017)
It’s now possible to connect two separate numbered lists so numbering of the second list carries from the
last number used of the previous list. This allows you to insert gaps, graphics, other paragraphs in the
middle of lists
In order to connect a list to a previous one, right click on the list
and select the menu ‘List Properties…’, to open the list
properties dialog (see screenshots above).
Check the ‘Link to previous list’ option to link lists. When you do
this the lists will take on a common numbering format.
Size
This field allows you to change the size of the number or bullet
character for the list or sub-list at the caret.
Color
Change the color of the bullet or number. You can either select a named color from the drop-down list, or
click the Edit button and use the color editor to choose a color. Once you have opened the color editor in
this way you can also click on any of the colors on the color line, if you want to choose a standard color.
In the Mar 2017 update the use of this option was extended to also work with bulleted lists and sub-lists.
When the option is checked, the current list picks up its settings from the previous list at the same level and
of the same type. So set this option on a bulleted sub-list and it will pick up the bullet symbol, margin,
indent, color, etc. settings from the previous sub-list of the same level.
Vertical Offset
This option allows you to adjust the vertical offset of the bullet/number relative to the list text. This is
particularly useful for bullet symbols because the vertical positions of these vary, so depending on which
symbols you choose for your bullets (see below), you will often find they don’t align nicely with the list text.
So use this vertical offset facility to adjust the alignment.
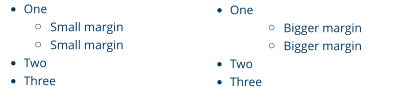
Indent
The indent is the space to the right of the numbers/bullets (the space between the numbers/bullets and
the start of the list text). So you can use the Indent controls to adjust this spacing for the list at the caret.
Release Notes
Page 31
Margin
The margin field controls the space to the left of the bullet/number, so you can use these controls to adjust
the horizontal offsets of sub-lists.
Replace With Symbol
This button is enabled for bulleted lists only and allows you to choose a different symbol for the list. It
brings up the symbol picker window, which lets you choose from hundreds of different symbols. You can
also search by keyword if you are looking for a particular symbol. If you choose any of the Material Icons
symbols, you will probably need to adjust the vertical position of the symbol, as described above. Here’s an
example:
A list using a graphical bullet symbol from the
Symbol library.
In this case the symbol can be found searching for
‘bullseye’.
In addition the bullets have been colored red and
had a vertical position adjustment.
A great benefit of using Symbols this way is that they are just characters from a symbol font, and so zoom
without quality loss, are resolution independent and look good on high-res devices such as Retina screens.
Replace From Clipboard
Designer allows you to use any graphic for your bullets or numbers in lists. Search for “Graphical bullets” in
the help for details on how to do this. The Replace from clipboard button in this dialog does the same as
the Paste as list bullet and Paste as list number operations in the context menu.

Release Notes
Page 32
Other List Editing Improvements (Mar 2017)
Various other small list editing improvements have been made in this update.Link to Heading (Nov 2016)
The Link dialog now has an option to link directly to any heading in your document. Previously you needed to add an anchor name manually to each heading, in order to link to the heading, but this is no longer necessary. Just select the heading you want to link to from the list.Vertically Aligned Text (Premium - Nov 2016)
You can now align text within text areas vertically, so it’s top, center or bottom aligned. This is useful wherever you want to align multi-line text vertically with other features on the page, especially text that you want to edit regularly so the number of lines varies. To change the vertical alignment of a text area, place the text caret in the text and select the button on the advanced text InfoBar. This reveals a menu allowing you to choose the vertical alignment. This option is not available for text columns or simple text lines.No repelling
Note that unlike normal top-aligned text, centered and bottom aligned text cannot currently be repelled. So objects with ‘Repel text under’ turned on will have no effect on such text.Ligatures (Premium - Mar 2017)
Many modern OpenType fonts include typographical ligatures, which allow pairs or sequences of consecutive characters in text to be displayed with a single glyph. They are used to improve the legibility and presentation of text and to introduce stylistic flourishes.


Release Notes
Page 33
Some fonts have very few or no ligatures, others have many and may also include multiple Stylistic Sets
(see below). Ligatures are organised into the following groups and you can choose which groups to turn on
or off independently for any range of characters. Select a character range in the Text Tool and then click on
the
button on the end of the Advanced Text bar, to access the ligature options.
Under the Open Type Ligatures option, you can select any or all of the following groups, for the current
selected characters:
Standard
The default set of ligatures the font designer has provided.
Discretionary
Discretionary ligatures are usually decorative - to be applied at the discretion of the user.
Historical
Historical ligatures are mainly ornamental suggesting a historical context.
Stylistic Sets
Some fonts include alternative sets of ligature characters that the user can choose from, allowing more flexibility. If any sets are available for any of the characters in the current text selection, they are listed under the Stylistic Sets sub-menu, where they can be turned on and off independently. Ligature settings can be used in text styles just like other text attributes.Hidden Text Styles (Mar 2017)
Text styles can now be marked as “hidden” in the text styles properties dialog, which means they won’t appear in the main styles list unless the text caret is located in text that uses that style. This is useful to help avoid the styles list becoming too long in documents that use a lot of different styles. Some SmartShapes such as the bar and column charts have their own text styles and these are now automatically made hidden styles, so they don’t appear in the main styles list. Similarly the TOC styles used for Tables of Contents are also hidden. Use the “Show hidden styles” option in the styles menu to have all styles included in the styles list. Additionally hidden styles can’t become current, so any new text you add to a design should never use a hidden style by default.
Release Notes
Page 34
Other Text Improvements (Nov 2016)
• (Nov 2016) A Delete Style operation has been added to the styles menu. So you no longer need to locate and remove every reference to a style in order to remove it from your document. • (July 2016) It’s easier and more predictable to select and cut or delete list items or single line paragraphs (such as headings). If you select a whole line from start to end, including the Carriage Return on the end, then a cut / delete will remove the whole list item. If you partially select a list item or line (e.g. not from the start of the item, but including the end of the line), then cut / delete will no longer join the following paragraph to this one. • (July 2016) Accidentally joining paragraphs of different styles and separating them again is more reliable. • Slight improved position and size of subscripts and superscripts. • (Mar 2017) Selecting ‘No style’ now removes the text style from the selected text without changing the appearance of the text. This is useful in cases where you don’t want to change the appearance of the text but you no longer wish it to pick up changes made to the text style in future. It’s also useful if you have a heading that you don’t want to appear in an automatically generated Table Of Contents. • (Mar 2017) ‘No style’ is now included in the Name Gallery style listPage & Layer Gallery - Object Naming
You can now give individual objects names in the Page & Layer Gallery, to help find objects and to organize your designs. Change object names the same way you change layer and page names in the gallery - just click on the name while the object is selected in the gallery, or right-click on it and choose Rename object.Import/Export
Improved PDF import
• Generally improved text reconstruction, including better justification detection and line spacing accuracy. • Clipview optimization (removal of unnecessary clipviews) • Improved import of bulleted/numbered lists import • Many other small improvements (more in Nov 2016 and Mar 2017 updates).Improved Word Import & Export (Premium)
• Import of diagrams (SmartArt objects, art borders, picture effects and other constructs) • Many other small improvements and fixes to both import and export in Mar 2017 update.Improved RTF Import & Export
Improved import of shapes, hyperlinks, text styles, gradients, transparency and many more improvements and fixes.
Release Notes
Page 35
Improved PowerPoint import (Mar 2017)
• Import of page animations • Import of step animations • Many other improvements and fixes'Website M' Hosting, Free for 365 Days
Web Designer Premium includes Website M’ hosting, free for one year (worth $1.99 a month). This includes 2GBytes of free web hosting space and one free domain name (e.g. yourname.com or .co.uk or .de, and others). Plus you can password protect your web pages.Xara Online Designer - Beta
Xara Online Designer offers an innovative and ultra-simple way to view, edit and update Xara documents and websites using a web browser on any computer or tablet (yes, even a Mac or Android tablet!), from anywhere in the world. What's more, Online Designer includes a small but growing number of templates that you can open, edit and publish (or save to PDF) such as CVs, social media headings, flyers and even a single page website - without even using the desktop software! Online Designer also gives you the ability to work on documents in collaboration with friends, colleagues and clients. Note: The Online Designer service is currently in beta but it’s progressing rapidly (see the Update Log here). It is included in the latest versions of Web Designer and Web Designer Premium while it is in beta. You can sign in to Online Designer here: https:/cloud.ixara.com - see our Outsider Tutorial An Intro to Online Designer for more information on how to get started.Other Content & Improvements
• All 160+ Business Web Themes now included (as previously sold for $15 each!) • 9 new General Website Themes all including mobile variants • A selection of new modern NavBar and standalone button designs • Social media templates such as Facebook, G+ and Twitter covers • Google Forms widget added to the Content Catalog. You can create your own custom forms but Google also offers templates for the most popular forms including surveys, questionnaires and contact forms. Plus there's an easy to use editor, reliable data storage, presentation and analysis. NEW - October 2016 • A wider range of photo hovers and photo sliders, and extra photo clipart
Release Notes
Page 36
•
A handy new page counter widge
•
New media player (audio and video) which utilizes the latest HTML5 capabilities of modern web
browsers, instead of relying on Flash.
•
It’s much easier to change the font or font size of a button. Now if you apply a font change to the
whole button text, if the mouse-over version uses the same font, it will also be changed to match.
•
If you’re using Windows 10, you’ll see a new button in the web preview window for previewing your
website in Microsoft’s new Edge browser.
•
Distribute operations added to Align toolbar.
•
(Mar 2017) Change width of all pages. Now if you change the width of one page in your document or
website, you are prompted to ask if the same change should be made to all pages.