
Headline New Features
Xara Designer Pro X11 has just been released. As usual there is an upgrade path from all older vesions, and from Photo & Graphic Designer, Web Designer and Page & Layout Designer. You can find details on our website here. • New web features • Art brushes • New liquify plug-in shape editing tools • New blend modes / transparency types • Automatic hyphenation • Auto-correct / abbreviation expansion • Embedded graphic options • Easy font replacement and more powerful text styles control • Improved PDF and Word import • Document Sync using Dropbox or Google Drive • MAGIX PanoramaStudio 2.6 • Other improvements
Release Notes
XARA
DESIGNER PRO X11


Page 1
Updated 16-Jul-2015
New Web Features
This document doesn’t describe the new web features that have already been released in Web Designer 11 Premium, which are also included in Designer Pro X11. See the Web Designer 11 release notes for details on these features.Art Brushes
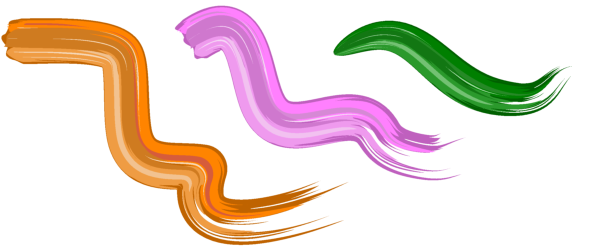
We are introducing a new type of brush stroke called an “Art” brush, which stretches the brush shape, which can be either vector or bitmap, along the line. This is an example vector brush design: And some example strokes using this brush The original type of brushes, in versions up to V10, are now called “Scatter” brushes because they repeat or scatter the brush shape at intervals along a line. But these have been improved as well. You can now use any kind of object in a brush definition. It's now possible to use feathering, text, extrusions, etc. in scatter brush definitions, which makes them much more powerful. Art brush strokes are only available in Designer Pro 11 and Photo and Graphic Designer 11.How to use:
In the Line Gallery there are some example Art brushes. 1. Use the Freehand drawing tool to draw a line as usual. 2. Give it a reasonably wide line width using the line width dropdown on the top bar. 36pt for example.
Release Notes
XARA
DESIGNER PRO X11
Page 2
3.
Double click on a brush design in one of the “(Art)” folders of the Line Gallery
, to apply that brush
to your line.
4.
Draw some new lines with the Freehand Tool and they will use the same current brush and line
width.
Creating your own brushes
As with Scatter brushes, you can create a new Art brush from any objects. Just select the object and press the Create Brush button on the Freehand Tool InfoBar. The following new dialog appears. This lets you choose whether to make an Art brush (the default) or a Scatter brush from the selection, and to enter a name for the new brush. After this your new brush appears as the first entry in the brushes dropdown on the Freehand Tool InfoBar and in the first “New brush strokes” folder in the Line Gallery. It’s also automatically selected as the current brush, so you can start drawing with it immediately. Choose a suitable line width from the line width control on the top bar. Guidelines for new brushes If brushes are created from bitmaps, then the bitmap should be clipped to remove as much empty space from the outside edges as possible. This means the brush will not introduce redundant invisible parts to the strokes you draw with it and it can also reduce the chances of rendering problems. If there is invisible space at the ends of the brush then lines won't terminate exactly at the points where you start and end the strokes. And if there is empty space along the top and bottom edges then the line won't appear to be of the correct width, it will appear narrower. Brushes should be more or less horizontal. Otherwise strokes will tend to deviate from the line you draw. Brushes should ideally be defined from fully saturated colours. This ensures that when you change the colors of brush strokes the stroke color achieved more closely matches the chosen color, rather than just being a shade of it.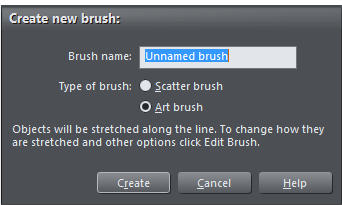
Release Notes
XARA
DESIGNER PRO X11
Page 3

Release Notes
XARA
DESIGNER PRO X11
Page 4
Coloring brush strokes
By default when you select a brush and draw with it, the line you draw has the same color(s) as the brush. But you can change the color of your line by simply selecting it and clicking a color on the color line, or using the Color Editor . Any new lines you draw subsequently will use the same brush and line color. To draw new lines that have the same characteristics as an existing line, just click on that line and then the next line you draw will look the same.Brush settings
To edit the settings of a brush, select a line that uses that brush and then press the Edit Brush button on the Freehand Tool InfoBar. The scaling options determine how the brush is made to fit your line. By default the brush is stretched along the line to fit the stroke. Alternatively you can choose the proportional option if you want to keep the brush design in proportion, ignoring the line width. With the “Repeat along stroke” option the brush definition is curved to follow the stroke line and repeated as many times as necessary to fit the line length. The brush design is stretched slightly to make a whole number of repeats fit the line. Note that strokes with very large numbers of repeats can be slow to render. The Line color options allow you to determine how the brush uses the current line color attribute. For example, if your current line color is set to red and you choose a green brush, do you want a red brush stroke or a green brush stroke? Ignore (Use colors in definition only) The first option means that the current line color will be ignored when you draw with this brush and you’ll get the natural colors of the brush. You can still change the line color of this brush stroke later if you want to, as described above.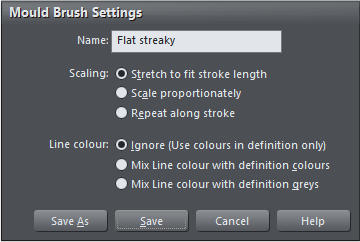

Release Notes
XARA
DESIGNER PRO X11
Page 5
Mix line color with definition colors
This option is intended for brushes that have a strong hue, such as the blue brushes provided. The blue in
those brushes is replaced with your chosen color.
Mix line color with definition greys
This option is intended for greyscale brushes, such as the pipe brush provided. The grey is replaced with a
corresponding shade of your chosen color. When you create a new grey brush, this coloring option is
selected for you by default.
Note when you change these options you are asked if you want the changes to apply to existing lines in
your design that use the brush. Use the Save As button to make a new brush instead of modifying the
current brush.
Liquify Shape Editing Tools
There’s a new dropdown list on the right end of the Shape Painter Tool
, which contains a selection of
vector shape editing tools. Select a tool from the list and choose a nib size on the left of the InfoBar. Then
select the shape you wish to edit and hold the left mouse button down to apply the nib to the edge of the
shape to modify it.
Plug-in Tools
The Liquify tools and SmartShapes use a new plug-in technology to provide ways to extend and enhance the drawing features of the program. It's our intention to publish a programming API that will allow third parties to extend Designer to add their own features, tools and SmartShapes. These are all written in the Javascript language. The API is not ready to be released yet, but if you are a Javascript developer and are interested in using this in future, please send us a support ticket to register your interest and we will contact you when it’s available.New Blend Modes / Transparency Types
In the Transparency Tool, the existing ‘stained glass’ and ‘bleach’ transparency types have been renamed to match the industry standard names ‘multiply’ and ‘screen’ repectively. We’ve also removed most of the other, less used and non-standard types from the supported list and replaced them with 5 new W3C standard blend modes, which are described below. Note that where existing documents use the types that have been removed, those types will still appear in the transparency type dropdown.Overlay
Overlay is a combination of Screen and Multiply and generally used to boost the contrast in an image. The areas of the top object where the underlying objects are light becomes lighter and the areas of the top object where the underlying objects are dark becomes darker.
Release Notes
XARA
DESIGNER PRO X11
Page 6
•
Grey (darker than 50% grey) will darken and add contrast to the underlying image.
•
Grey (lighter than 50% grey) will lighten and add contrast to the underlying image.
•
Other colors - lightens and adds contrast to unsaturated colors and darkens and adds contrast to
saturated colors.
Hard Light
Hard Light combines Multiply and Screen transparency modes. Equivalent to Overlay, but with the bottom and top objects swapped. • White - no effect on the colors in underlying objects, the whites remain completely white. • Black - no effect on the colors in underlying objects, the blacks remain completely black.Soft Light
This is a softer version of Hard Light. Again works similarly to Overlay although in a softer and less harsh way than Hard Light.Luminosity
Luminosity affects the "lightness" of the image. It blends the lightness values of the top objects with the lightness values of the underlying objects, whilst ignoring the color values.Color
Color is a combination of hue and saturation. Almost the opposite of Luminosity, the colors of the top objects are blended with the colors of the underlying objects whilst ignoring the luminance values.Hyphenation
Hyphenating long words at the ends of lines in a flowing paragraph of text allows more text to fit on fewer lines. This is especially important with fully justified text to reduce the “rivers of white” problem, where a lot of white space has to be introduced to pad out each line to the exact width of the text column. In earlier versions of Designer, words were only hyphenated if they contained an actual hyphen character or had a soft hyphen added manually. Version 11 now includes automatic hyphenation as a new paragraph attribute. It uses a combination of built-in hyphenation rules, language-specific hyphenation dictionaries and even an optional list of custom hyphenations for each document. With the following full justified paragraph example, note how the spacing of the second line of text is much better when hyphenation is on. Hyphenation Off
Release Notes
XARA
DESIGNER PRO X11
Page 7
Hyphenation On
To turn the auto hyphenation feature on or off - click on the hyphenation button
in the flyout bar at
the end of the text tool InfoBar. Remember this is a paragraph option, so select the text to which you want
to make the change first.
Hyphenation Settings
To change the hyphenation settings for the current document, click on the Hyphenation Settings option in the dropdown menu of the spellchecker . The settings dialog will appear. You can control the size of the shortest word that can be hyphenated, as well as how far from the beginning and end of a word hyphens can be introduced. Adjusting the Hyphenation Zone will change the degree of "raggedness" before hyphenation is applied. So for example, with left justified text this would be the size of the margin to the right that would be empty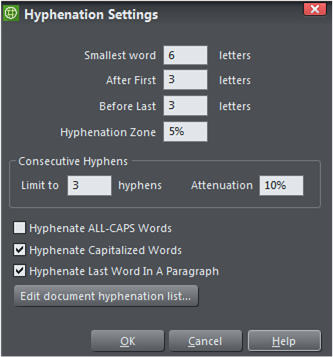


Release Notes
XARA
DESIGNER PRO X11
Page 8
without trying to fit in more text using automatic hyphenation. With right justified text this would be the
margin to the left, and with fully justified text this would be empty areas - "rivers of white" between words.
Increasing the zone allows less hyphenation, and consequently more white space. The Hyphenation Zone
can be expressed as an absolute value as in pixels, mm, etc., or as a percentage of the width of the text
object (the default is 5%).
Use the Consecutive Hyphens fields to limit the number of consecutive lines that can end in hyphenated
words. The Attenuation setting specifies a "soft" limit on this, so that you can set a balance between having
consecutive hyphenated lines and lots of white space on following lines. A useful value is between 5% and
10%. Values higher than 20% often inhibit consecutive hyphens so much that they no longer occur at all.
The final three checkbox options allow you to choose whether ALL-CAPS WORDS, Capitalised Words and
the last words in a paragraph can be hyphenated or not.
Custom hyphenation lists
You can add hyphenation rules to your document for specific words . Click the Edit document hyphenation list button on the settings dialog. The dialog shows the current list of words for the current document and allows you to enter new words. Use the tilde “~” character in a word to specify the hyphenation point(s) for that word. Or if you want to prevent a word from being hyphenated at all, enter the word without any tilde “~” characters in it.Personal hyphenation list
Each time you add a word to the hyphenation list for a document, that word is also added to a personal hyphenation list stored on your computer. Similarly, removing a word also removes the word from your personal list. This list is automatically applied to all new blank documents you create (File->New), so you don’t need to keep adding the same words to all your documents. However when you open an existing document, your personal hyphenation list is NOT automatically applied to it, because that could change the way the document appears. It would mean that two people opening the same document, could potentially see different results, because of their different personal hyphenation lists. So instead applying your personal list to a document has to be done explicitly - simply press the “Import my list” button on the Document hyphenation list dialog.Hyphenation in websites
You can use hyphenation in your websites, but since Designer controls the exact length of each line of text in the website HTML (so that you get an accurate representation of your page in all browsers), words that are hyphenated at the ends of lines are broken into two parts. This means search engines won’t index your site on these broken words.
Release Notes
XARA
DESIGNER PRO X11
Page 9
Abbreviation Expansion
In the spell-checker drop-down on the Text Tool InfoBar there is now a new “Auto-correction options …” entry. This allows you to set up your own shortcuts for terms or abbreviations that you tend to type regularly. So if you want to be able to type “Rwd” and have that instantly replaced with “Responsive Web Design”, simply press the Add button and enter “rwd” in the replace field and “responsive web design” in the with field. All text in the dialog is forced to lower case, but the replacement tries to be smart about use of case, so:- RWD is replaced with RESPONSIVE WEB DESIGN rwd is replaced with responsive web design Rwd is replaced with Responsive Web Design Commonly used replacements are already set up by default, so for example you can type (C) to get a copyright symbol ©. You can also replace text you type with a symbol from the Font Awesome symbol collection included in Designer, to make it easy to enter commonly used symbols into text. Enter the text you want to replace, click in the “With” field and press the “Pick Symbol…” button to bring up the symbol picker dialog. The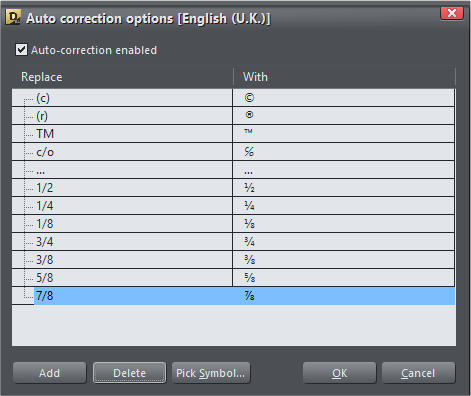
Release Notes
XARA
DESIGNER PRO X11
Page 10
symbol you choose will appear in the “With” field.
Embedded Graphic Options
You now have much more control over how text is formatted around objects that you paste “embedded” into text. As in previous versions, to embed an object copy or cut it to the clipboard, go into the Text Tool and place the text caret at the point in the text where you want to insert it, and then paste. Now if the object you insert is wider than the text area or text column, the object is automatically resized down to the width of the text column. Right-click on the embedded object and choose the new “Embedding Options “ entry near the top of the context menu.Scaling
In the first section of the new dialog you can specify how the embedded graphic should behave if the width of the text column/area is changed, or if the graphic flows into a text area with a different width.
Release Notes
XARA
DESIGNER PRO X11
Page 11
Resize for narrower columns
With this option (the default), the object will resize down if it’s too wide for the text column, but it will not
grow up above its original size if the column is wider than the object.
Resize relative to column width
This option allows you to specify that the embedded object should always be a fixed % of the column
width.
Fixed size
This option turns off the automatic resizing, so the object will never change its size.
Scale only in horizontal direction
This option is useful mainly for simple divider or rule-off graphics, where you want the object to just stretch
horizontally without getting taller or shorter depending on the column width. It’s useful only for very
simple designs because more elaborate graphical divider designs are not likely to stretch well without
looking distorted.
Positioning
In this section of the dialog you choose how the graphic should be formatted into the text. The default option is “Inline with text”, which means the graphic behaves just as if it’s a large text character in the text. So use this option when you want to include a graphic in a line of text as if it was a character, like this or if you want it on a line of its own. This is how all embedded objects were formatted in earlier versions of Designer. Alternatively you can now choose to have the text flowing to the right of your embedded graphic, like this, by choosing the “Text wraps right” positioning option. Or if you want the graphic on the right and the the text flowing to the left, like this, choose the “Text wraps left” positioning option instead.

,

Release Notes
XARA
DESIGNER PRO X11
Page 12
Margins
The bottom section of the dialog allows you to add some space around your graphic, so it doesn’t appear too close to the text or to the edge of the column. The embedded photos above have a margin of 50px applied on just one side, to make sure there is a gap between the text and the photos. You can specify different values for each of the 4 sides of your graphic, or use the lock buttons if you want to have the same margin top and bottom, or left and right, without entering the same values repeatedly.Break - Move below embedded graphic
When you have text flowing to the left or right of an embedded graphic, sometimes you may want to force the next paragraph of text to start below the graphic. So to enable this, there is now a new type of break character that you can insert: Insert->Break->Move below embedded graphic. This is used in the text above, alongside the embedded photo examples.Font Replacement & Styles
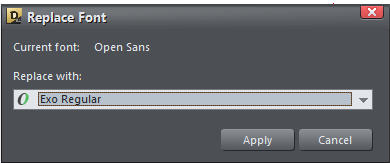
It’s often useful to be able to completely replace one font with another across your entire document or website, especially if you don’t have a particular font installed and want to replace it with a font you do have. In the Text Tool just right click in the text with the font you want to replace and choose the new “Replace font with …” option from the context menu. Choose the font you want to use instead and click Apply. All variants of the font are replaced across your document, each with the matching variant and size of your chosen font. There’s also a new entry in the text styles menu , “Update other style to match”, which will help you to apply text styles to unstyled documents, or update an existing style to look like some unstyled text you’ve imported. For example perhaps you’ve pasted in some text that you like the look of from another document and you want to make all your ‘Normal text’ look like that text. Just select the text and choose this new style option.
Release Notes
XARA
DESIGNER PRO X11
Page 13
Select the style you want to update and click Apply to make that style look like the selected text.
The “Apply to all similar text in this document” option is useful if you are applying text styles to a document
that doesn’t use styles already, such as an imported PDF. If selected, as well as updating the selected style,
the operation will also look for text that is similar to the selected text, right across your document and will
apply the style to that text too. ‘Similar text’ is text that has the same font and size and with the same
margin settings. The “Apply only to unstyled text” option is useful if you don’t want to change any text that
already has a text style applied.
PDF Import Improvements
• Improved text editability (improved text reconstruction, margins, better text link import, better underline import). • Better support for import and editing of PDFs with embedded font subsets, where fonts are not installed locally. • Many other fixes and improvementsMAGIX PanoramaStudio 2.6
Improvements compared to version 2.5: • A new high-performance blending procedure renders big panoramas significantly faster. • The new Image manager allows replacing and selective editing of input images, even after the image stitching. • A new option allows converging lines in planar/perspective projections to be avoided. • A new option to add GPS location information to panoramas (Geotagging). • 90 new cameras were added to the camera database which now contains more than 2100 digital compact and SLR cameras. • The updated RAW import now supports more than 500 cameras. • A new option to add metadata to panoramic images, which allows Google services to automatically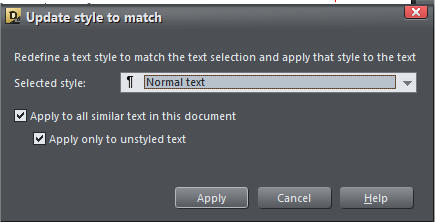
Release Notes
XARA
DESIGNER PRO X11
Page 14
detect panorama images.
•
The HTML5 version of the "PanoramaStudio Viewer" for interactive panoramas now uses WebGL, if
available, and there is no longer a limit on the size of panoramas viewed.
Document Sync using Dropbox or Google Drive
Designer 11 supports a number of innovate features related to ‘cloud drive’ services from Dropbox and Google Drive. These services provide free file storage in the cloud, and a small desktop utility that can be installed on your PC that will automatically sync files saved on your hard disc to the cloud - and if the file is shared with other users, or you have Dropbox on any other computer, then it’s synced to that other computer. Once in one of these cloud drives, you can also edit the text in your documents in Online Designer, using any web browser or mobile device. Changes you make with Online Designer will be saved back to the cloud drive and then in turn synchronised to your other computers.Multi-location editing
Designer 11 now notices if files have changed, and will automatically reload updated files. This is particularly useful if the file is saved in a Dropbox or Google Drive folder on your computer. It means that you can have the same file open on multiple computers, or in Online Designer, and if you make an edit, save the file, then it will be updated in Designer on the other computers. Further, using the cloud drive file sharing, you can share the file with someone else, and whenever they edit the file and save, your version will be updated, and vice versa. This does not solve the problem of edit clashes. So if you edit the file and at the same time someone else edits the same file, then Designer will tell you there has been an edit and give you the choice of opening the updated file in a new document.Revert to earlier versions
One particularly cool feature that comes as a consequence of this is that Dropbox and Google Drive
maintain older versions of your files, and provide ways of viewing and reverting back to earlier versions (in
Dropbox you just right click on a file and select 'View previous versions'.)
So if you have have a document open in Designer, and then revert that file to an older version from Dropbox, that causes the file on your computer to be replaced by an older version, and Designer will automatically re-open the older version. This is a safe, easy, and storage-saving way of maintaining multiple versions of files.

Release Notes
XARA
DESIGNER PRO X11
Page 15